Netgear GS116GE 16xGE инструкция по эксплуатации
Инструкция по эксплуатации на русском языке предназначена для владельцев Netgear GS116GE 16xGE. В PDF-документе подробно описаны особенности устройства, его функции и основные правила эксплуатации. Перед тем как начать пользоваться техникой, рекомендуем внимательно ознакомиться с содержанием руководства.
Наш проект MaxPoints позволяет изучать инструкцию без использования какого-либо дополнительного программного обеспечения. С PDF-версией документа вы можете ознакомиться ниже, воспользовавшись постраничной навигацией или оглавлением.
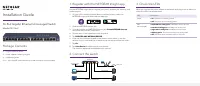
Installation Guide
16-Port Gigabit Ethernet Unmanaged Switch
Model GS116v2
Package Contents
• Gigabit Ethernet switch
• Power adapter (varies by region)
• Installation guide
Note:
You can wall mount the switch. A wall-mount kit is not included.
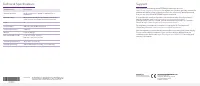
3. Check the LEDs
When you connect the power adapter to the switch and plug it into an electrical
outlet, the LEDs indicate the status.
LED
Description
Power
•
On
. The switch is receiving power.
•
Off
. The switch is not receiving power.
Port
(left and right)
•
Both LEDs are solid green
. 1000 Mbps link on this port.
•
Left LED is solid green
. 100 Mbps link on this port.
•
Right LED is solid green
. 10 Mbps link on this port.
•
Blinking green
. The port is sending or receiving traffic.
•
Off
. The switch does not detect a link on this port.
1. Register with the NETGEAR Insight app
Use the NETGEAR Insight App to register your switch, activate your warranty, and
access support.
1. On your iOS or Android mobile device, visit the app store, search for
NETGEAR Insight, and download the latest app.
2. Open the NETGEAR Insight app.
3. If you did not set up a NETGEAR account, tap
Create NETGEAR Account
and follow the onscreen instructions.
4. Tap the menu in the upper-left corner to open it.
5. Tap
REGISTER ANY NETGEAR DEVICE
.
6. Enter the serial number located on the bottom of the switch, or use the
camera on your mobile device or tablet to scan the serial number bar code.
7. Tap
Go
.
8. Tap
View Device
to add the switch to a network.
The switch is registered and added to your account.
2. Connect the switch
Internet
Router
ReadyNAS
Sample connections
GS116v2
Desktop
Smar t T V
Access point
Gaming console