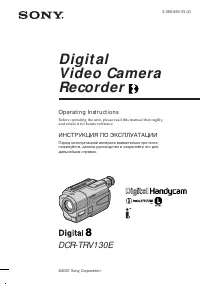
стр. 2 - English; camcorder. With your Digital; WARNING; Русский; ПРЕДУПРЕЖДЕНИЕ
2 English Welcome! Congratulations on your purchase of this SonyDigital Handycam camcorder. With your Digital Handycam, you can capture life’s preciousmoments with superior picture and soundquality.Your Digital Handycam is loaded with advancedfeatures, but at the same time it is very easy touse. You...
стр. 3 - Руководство по быстрым функциям; Функции для регулировки экспозиции (в режиме записи); Функции для использования при монтаже (в режиме записи)
4 Русский Руководство по быстрым функциям Функции для регулировки экспозиции (в режиме записи) • В темном месте • При недостаточном освещении • В темных окружающих условиях, например, заход солнца, фейерверки или общие ночные виды • Съемка объектов с задней подсветкой • При прожекторном освещении, н...
стр. 4 - Оглавление
6 Русский Оглавление Руководство по быстрым функциям ...... 4Проверка прилагаемых принадлежностей ............................... 7 Руководство по быстромузапуску ..................................................... 10 Подготовка к эксплуатации Использование данного руководства .......................
стр. 5 - Wireless Remote Commander
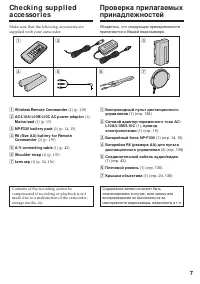
7 Getting started Подготовка к эксплуатации Checking suppliedaccessories Make sure that the following accessories aresupplied with your camcorder. 1 Wireless Remote Commander (1) (p. 138) 2 AC-L10A/L10B/L10C AC power adaptor (1), Mains lead (1) (p. 15) 3 NP-F330 battery pack (1) (p. 14, 15) 4 R6 (Si...
стр. 6 - Руководство по быстрому запуску; Подсоединение провода электропитания; на кассетном
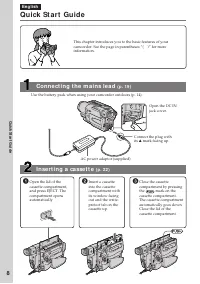
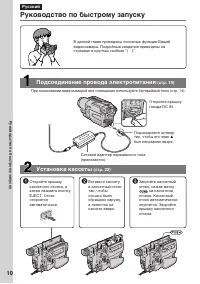
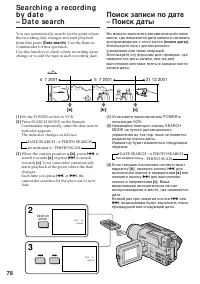
10 Руководство по быстрому запуску Русский Руководство по быстрому запуску В данной главе приведены основные функции Вашейвидеокамеры. Подробные сведения приведены настранице в круглых скобках “( )”. Откройте крышкугнезда DC IN. Подсоедините штекертак, чтобы его знак v был направлен вверх. Подсоедин...
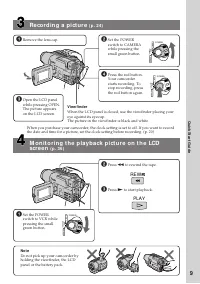
стр. 7 - Запись изображения; Видоискатель; Контроль воспроизводимого изображения на; ПРИМЕЧАНИЕ
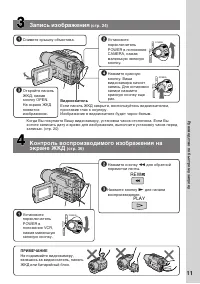
11 4 Нажмите красную кнопку. Вашавидеокамера начнетзапись. Для остановкизаписи нажмитекрасную кнопку ещераз. Запись изображения (стр. 24) 3 Откройте панельЖКД, нажавкнопку OPEN.На экране ЖКДпоявитсяизображение. 1 Снимите крышку объектива. 2 Установите переключательPOWER в положениеCAMERA, нажавмален...
стр. 8 - — Getting started —; Using this manual; Before using your camcorder; — Подготовка к эксплуатации —
12 — Getting started — Using this manual As you read through this manual, buttons andsettings on your camcorder are shown in capitalletters.e.g. Set the POWER switch to CAMERA.When you carry out an operation, you can hear abeep sound to indicate that the operation is beingcarried out. Before using y...
стр. 9 - • Не допускайте, чтобы видеокамера; • Do not let your camcorder get wet. Keep your
13 Getting started Подготовка к эксплуатации Меры предосторожности приуходе за видеокамерой Объектив и экран ЖКД/видоискатель(только на смонтированных моделях) • Экран ЖКД и видоискатель изготовлены спомощью высокопрецизионнойтехнологии, так что свыше 99,99%элементов изображения предназначеныдля эфф...
стр. 10 - Installing the battery pack; Slide the battery pack down until it clicks.; To remove the battery pack; Step 1 Preparing the; Установка батарейного блока; Для снятия батарейного блока; BATT RELEASE
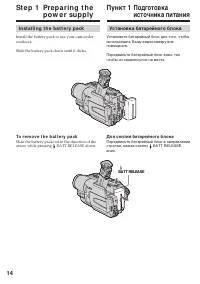
14 Installing the battery pack Install the battery pack to use your camcorderoutdoors. Slide the battery pack down until it clicks. To remove the battery pack Slide the battery pack out in the direction of thearrow while pressing BATT RELEASE down. Step 1 Preparing the power supply Пункт 1 Подготовк...
стр. 11 - Step 1 Preparing the power; Connect the mains lead to the mains.; Пункт 1 Подготовка источника; штекера был направлен вверх.; Лампа CHG
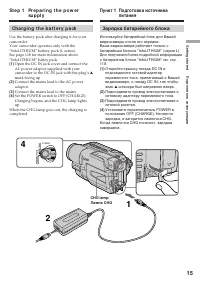
15 Getting started Подготовка к эксплуатации Step 1 Preparing the power supply Charging the battery pack Use the battery pack after charging it for yourcamcorder.Your camcorder operates only with the“InfoLITHIUM” battery pack (L series).See page 118 for more information about“InfoLITHIUM” battey pac...
стр. 12 - After charging the battery pack; Notes; • Prevent metallic objects from coming into; When the battery pack is charged fully; The CHG lamp goes out.; If the battery pack is not installed properly; После зарядки батарейного блока; Примечания; • Не допускайте контакта металлических; Если батарейный блок заряжен полностью; Лампочка CHG погаснет.
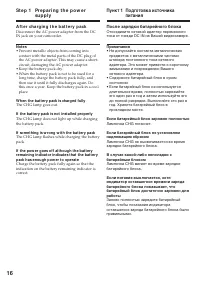
16 After charging the battery pack Disconnect the AC power adaptor from the DCIN jack on your camcorder. Notes • Prevent metallic objects from coming into contact with the metal parts of the DC plug ofthe AC power adaptor. This may cause a short-circuit, damaging the AC power adaptor. • Keep the bat...
стр. 13 - Recording with; Время зарядки
17 Getting started Подготовка к эксплуатации Step 1 Preparing the power supply Recording with Recording with Battery pack/ the viewfinder/ the LCD screen/ Батарейный Запись с помощью Запись с помощью блок видоискателя экрана ЖКД Continuous* Typical** Continuous* Typical** Непрерывная* Типичная** Неп...
стр. 14 - Время воспроизведения; Playing time; What is ”InfoLITHIUM”?; Что такое “InfoLITHIUM”?
18 Playing time/ Время воспроизведения Playing time Playing time Battery pack/ on LCD screen/ with LCD closed/ Батарейный блок Время воспроизведения Время воспроизведения на экране ЖКД при закрытом ЖКД NP-F330 (supplied)/ (прилагается) 105 90 NP-F530 175 150 NP-F550 210 185 NP-F730 365 305 NP-F750 4...
стр. 15 - на; ПРЕДОСТЕРЕЖЕНИЕ; • Питание от сетевого адаптера переменного; Использование автомобильного аккумулятора; Connecting to the mains; PRECAUTION; • The AC power adaptor can supply power even; Using a car battery
19 Getting started Подготовка к эксплуатации Подсоединение к сетевойрозетке Если Вы собираетесь использоватьвидеокамеру длительное время,рекомендуется использовать питание отэлектрической сети с помощью сетевогоадаптера переменного тока. ( 1 ) Откройте крышку гнезда DC IN иподсоедините сетевой адапт...
стр. 16 - Turn the SEL/PUSH EXEC dial to select; Пункт 2 Установка даты; Step 2 Setting the
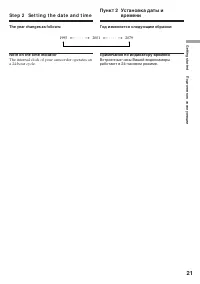
20 Set the date and time settings when you use yourcamcorder for the first time. If you do not use your camcorder for about 4months, the date and time settings may bereleased (bars may appear) because the built-inrechargeable lithium cell in your camcorder willhave been discharged.First, set the yea...
стр. 17 - Год изменяется следующим образом:; Пункт 2 Установка даты и; The year changes as follows:; Step 2 Setting the date and time
21 Getting started Подготовка к эксплуатации Год изменяется следующим образом: Примечание по индикатору времени Встроенные часы Вашей видеокамерыработают в 24-часовом режиме. Пункт 2 Установка даты и времени The year changes as follows: Note on the time indicator The internal clock of your camcorder...
стр. 18 - Для извлечения кассеты; We recommend using Hi8; To eject a cassette; Step 3 Inserting a
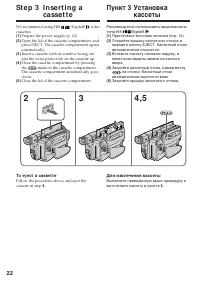
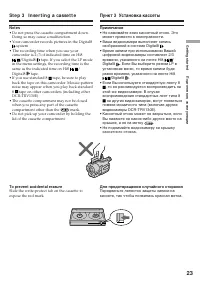
22 Рекомендуется использовать видеокассетытипа Hi8 /Digital8 . ( 1 ) Приготовьте источник питания (стр. 14). ( 2 ) Откройте крышку кассетного отсека инажмите кнопку EJECT. Кассетный отсекавтоматически откроется. ( 3 ) Вставьте кассету окошком наружу, алепестком защиты записи на кассетевверх. ( 4 ) З...
стр. 19 - Step 3 Inserting a cassette
23 Getting started Подготовка к эксплуатации Notes • Do not press the cassette compartment down. Doing so may cause a malfunction. • Your camcorder records pictures in the Digital8 system. • The recording time when you use your camcorder is 2/3 of indicated time on Hi8 /Digital8 tape. If you select ...
стр. 20 - — Recording – Basics —; Your camcorder automatically focuses for you.; Микрофон
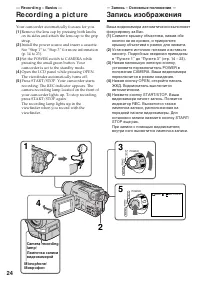
24 5 3 1 2 40min REC 0:00:01 VCR POWER OFF CAMERA (CHARGE ) VCR POWER OFF CAMERA (CHARGE ) 4 — Recording – Basics — Recording a picture Your camcorder automatically focuses for you. ( 1 ) Remove the lens cap by pressing both knobson its sides and attach the lens cap to the gripstrap. ( 2 ) Install t...
стр. 21 - • Плотно пристегните ремень для захвата; Примечание по режиму записи
25 Recording – Basics Запись – Основные положения Notes • Fasten the grip strap firmly.• Do not touch the built-in microphone during recording. Note on Recording mode Your camcorder records and plays back in the SP(standard play) mode and in the LP (long play)mode. Select SP or LP in the menu settin...
стр. 22 - indicator appears on the screen; Mirror mode; The STBY indicator appears as; Индикатор STBY появится в виде
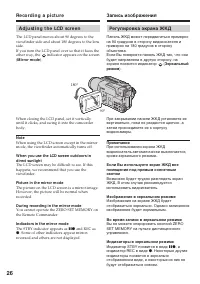
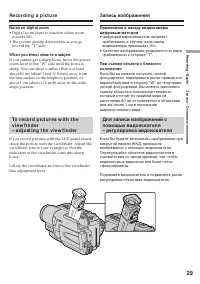
26 Recording a picture Adjusting the LCD screen The LCD panel moves about 90 degrees to theviewfinder side and about 180 degrees to the lensside.If you turn the LCD panel over so that it faces theother way, the indicator appears on the screen ( Mirror mode ). When closing the LCD panel, set it verti...
стр. 23 - LCD screen backlight; The recorded picture will not be affected.; After recording; After using your camcorder; На записанное изображение это не повлияет.; После записи; Присоедините крышку объектива.; После использования Вашей видеокамеры
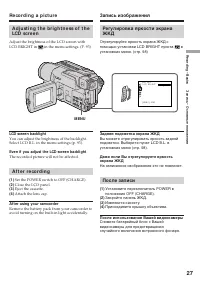
27 Recording – Basics Запись – Основные положения Recording a picture Запись изображения Adjusting the brightness of theLCD screen Adjust the brightness of the LCD screen withLCD BRIGHT in in the menu settings. (P. 93) LCD screen backlight You can adjust the brightness of the backlight.Select LCD B....
стр. 24 - Zoom greater than 20; Сторона “W”: для широкоугольного вида
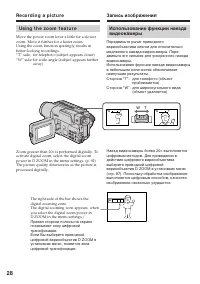
28 Recording a picture Using the zoom feature Move the power zoom lever a little for a slowerzoom. Move it further for a faster zoom.Using the zoom function sparingly results inbetter-looking recordings.“T” side: for telephoto (subject appears closer)“W” side: for wide-angle (subject appears farther...
стр. 25 - Notes on digital zoom; • Digital zoom starts to function when zoom; When you shoot close to a subject; • Цифровой вариообъектив начинает
29 Recording – Basics Запись – Основные положения Recording a picture Запись изображения Notes on digital zoom • Digital zoom starts to function when zoom exceeds 20 × . • The picture quality deteriorates as you go toward the “T” side. When you shoot close to a subject If you cannot get a sharp focu...
стр. 26 - The indicators are not recorded on tape.; Индикаторы не записываются на ленту.; Remaining battery time indicator/; This appears after you start to record for a while./
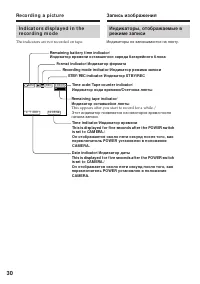
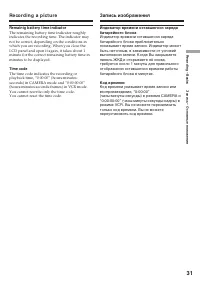
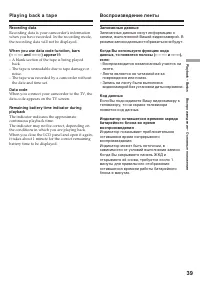
30 Indicators displayed in therecording mode The indicators are not recorded on tape. 0:00:01 12:05:56 4 7 2001 40 min REC Recording a picture Запись изображения Индикаторы, отображаемые врежиме записи Индикаторы не записываются на ленту. STBY/REC indicator/ Индикатор STBY/REC Remaining battery time...
стр. 27 - Код времени
31 Recording – Basics Запись – Основные положения Индикатор времени оставшегося зарядабатарейного блока Индикатор времени оставшегося зарядабатарейного блока приблизительнопоказывает время записи. Индикатор можетбыть неточным, в зависимости от условийвыполнения записи. Когда Вы закрываетепанель ЖКД ...
стр. 28 - BACK LIGHT; indicator appears on the screen.; Функция задней подсветки будет отменена.
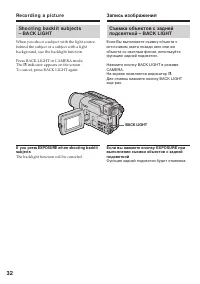
32 Recording a picture BACK LIGHT Shooting backlit subjects– BACK LIGHT When you shoot a subject with the light sourcebehind the subject or a subject with a lightbackground, use the backlight function. Press BACK LIGHT in CAMERA mode.The . indicator appears on the screen. To cancel, press BACK LIGHT...
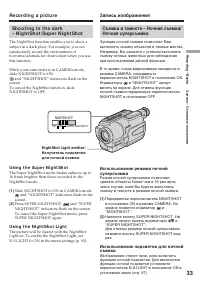
стр. 29 - Using the Super NightShot; Slide NIGHTSHOT to ON in CAMERA mode.; Using the NightShot Light; and “NIGHTSHOT” indicators flash on the; NightShot Light emitter/; и “NIGHTSHOT” начнут
33 Recording – Basics Запись – Основные положения Using the Super NightShot The Super NightShot mode makes subjects up to16 times brighter than those recorded in theNightShot mode. ( 1 ) Slide NIGHTSHOT to ON in CAMERA mode. and “NIGHTSHOT” indicators flash on the screen. ( 2 ) Press SUPER NIGHTSHOT...
стр. 30 - • Do not use the NightShot function in bright; Shutter speed in the Super NightShot mode; • Не используйте функцию ночной съемки в; Подсветка для ночной съемки
34 Recording a picture Notes • Do not use the NightShot function in bright places (ex. outdoors in the daytime). This maycause your camcorder to malfunction. • When you keep NIGHTSHOT setting to ON in normal recording, the picture may be recordedin incorrect or unnatural colours. • If focusing is di...
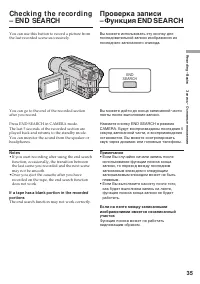
стр. 31 - • If you start recording after using the end search; Проверка записи; • Если Вы случайно начали запись после
35 Recording – Basics Запись – Основные положения Checking the recording– END SEARCH You can use this button to record a picture fromthe last recorded scene successively. You can go to the end of the recorded sectionafter you record. Press END SEARCH in CAMERA mode.The last 5 seconds of the recorded...
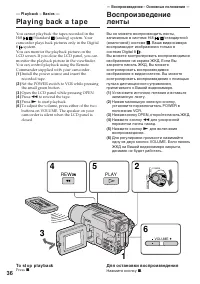
стр. 32 - — Playback – Basics —; Playing back a tape; Open the LCD panel while pressing OPEN.; To stop playback; — Воспроизведение – Основные положения —; Для остановки воспроизведения
36 — Playback – Basics — Playing back a tape You cannot playback the tapes recorded in theHi8 /Standard (analog) system. Your camcorder plays back pictures only in the Digital8 system.You can monitor the playback picture on theLCD screen. If you close the LCD panel, you canmonitor the playback pictu...
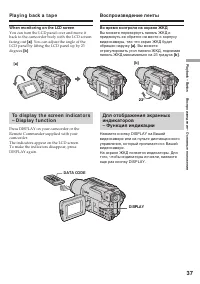
стр. 33 - Во время контроля на экране ЖКД; . You can adjust the angle of the; DISPLAY; Воспроизведение ленты
37 Playback – Basics Воспроизведение – Основные положения Во время контроля на экране ЖКД Вы можете перевернуть панель ЖКД ипридвинуть ее обратно на место к корпусувидеокамеры, так что экран ЖКД будетобращен наружу [a] . Вы можете отрегулировать угол панели ЖКД, поднимаяпанель ЖКД максимально на 23 ...
стр. 34 - Использование функции кода данных; Using the data code function; Not to display recording date; Различные установки
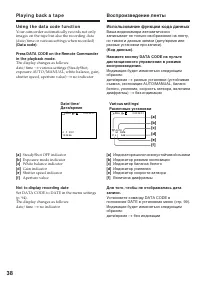
38 Использование функции кода данных Ваша видеокамера автоматическизаписывает не только изображения на ленту,но также и данные записи (дату/время илиразные установки при записи). (Код данных) . Нажмите кнопку DATA CODE на пультедистанционного управления в режимевоспроизведения. Индикация будет измен...
стр. 35 - Записанные данные; – Воспроизводится незаписанный участок на; Код данных; – A blank section of the tape is being played; Data code
39 Playback – Basics Воспроизведение – Основные положения Playing back a tape Воспроизведение ленты Записанные данные Записанные данные несут информацию озаписи, выполненной Вашей видеокамерой. Врежиме записи данные отображаться не будут. Когда Вы используете функцию кодаданных, то появятся полосы (...
стр. 36 - Various playback modes; To advance the tape; Для ускоренной перемотки ленты назад
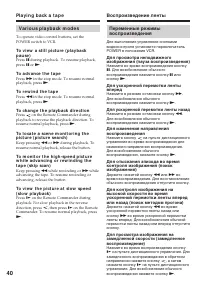
40 Various playback modes To operate video control buttons, set thePOWER switch to VCR. To view a still picture (playbackpause) Press X during playback. To resume playback, press X or N . To advance the tape Press M in the stop mode. To resume normal playback, press N . To rewind the tape Press m in...
стр. 37 - To view the picture at double speed; In the various playback modes; В переменных режимах воспроизведения
41 Playback – Basics Воспроизведение – Основные положения To view the picture at double speed Press × 2 on the Remote Commander during playback. For double speed playback in thereverse direction, press , then press × 2 on the Remote Commander. To resume normalplayback, press N . To view the picture ...
стр. 38 - Желтый
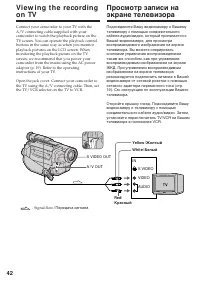
42 Viewing the recordingon TV Connect your camcorder to your TV with theA/V connecting cable supplied with yourcamcorder to watch the playback picture on theTV screen. You can operate the playback controlbuttons in the same way as when you monitorplayback pictures on the LCD screen. Whenmonitoring t...
стр. 39 - Viewing the recording on TV; If your TV has an S video jack
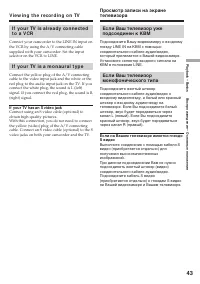
43 Playback – Basics Воспроизведение – Основные положения Viewing the recording on TV If your TV is already connectedto a VCR Connect your camcorder to the LINE IN input onthe VCR by using the A/V connecting cablesupplied with your camcorder. Set the inputselector on the VCR to LINE. If your TV is a...
стр. 41 - • During the tape photo recording, you cannot
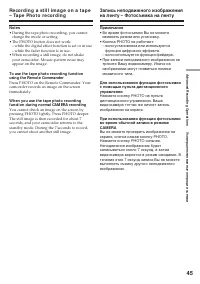
45 Advanced Recording Operations Усовершенствованные операции съемки Notes • During the tape photo recording, you cannot change the mode or setting. • The PHOTO button does not work: – while the digital effect function is set or in use.– while the fader function is in use. • When recording a still i...
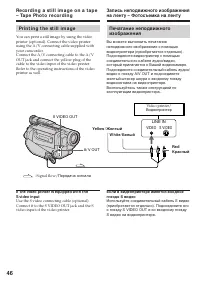
стр. 42 - Printing the still image; Передача сигнала
46 A/ V OUT LINE IN VIDEO S VIDEO S VIDEO OUT Printing the still image You can print a still image by using the videoprinter (optional). Connect the video printerusing the A/V connecting cable supplied withyour camcorder.Connect the A/V connecting cable to the A/VOUT jack and connect the yellow plug...
стр. 43 - Using the wide mode; during playing back on a normal TV; To cancel the wide mode; Set 16:9WIDE to OFF in the menu settings.; Для отмены широкоэкранного режима
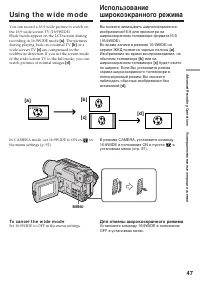
47 Advanced Recording Operations Усовершенствованные операции съемки MENU Using the wide mode You can record a 16:9 wide picture to watch onthe 16:9 wide-screen TV (16:9WIDE).Black bands appear on the LCD screen duringrecording in 16:9WIDE mode [ a ] . The pictures during playing back on a normal TV...
стр. 44 - ” flashes; Во время записи; ”, а функция SteadyShot не будет
48 In the wide mode, you cannot select thefollowing functions: – Old movie– Bounce During recording You cannot select or cancel the wide mode. Whenyou cancel the wide mode, set your camcorder tothe standby mode and then set 16:9WIDE to OFFin the menu settings. If the wide mode is set to ON The Stead...
стр. 45 - Fade in only; FADER; MONOTONE; Только плавное введение изображения
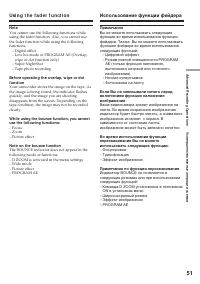
49 Advanced Recording Operations Усовершенствованные операции съемки You can fade the picture in or out to give yourrecording a professional appearance. Using the faderfunction MONOTONE When fading in, the picture gradually changesfrom black-and-white to colour.When fading out, the picture gradually...
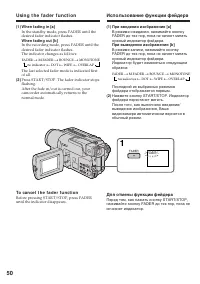
стр. 46 - Using the fader function; To cancel the fader function; Использование функции фейдера; При введении изображения; Для отмены функции фейдера
50 Using the fader function ( 1 ) When fading in [ a ] In the standby mode, press FADER until thedesired fader indicator flashes. When fading out [ b ] In the recording mode, press FADER until thedesired fader indicator flashes.The indicator changes as follows: no indicator T DOT T WIPE T OVERLAP FA...
стр. 47 - wipe or dot function only); Note on the bounce function; Примечание; ON в установках меню
51 Advanced Recording Operations Усовершенствованные операции съемки Note You cannot use the following functions whileusing the fader function. Also, you cannot usethe fader function while using the followingfunctions: – Digital effect– Low lux mode of PROGRAM AE (Overlap, wipe or dot function only)...
стр. 48 - : The colour and brightness of the; SEPIA; The image expands vertically.
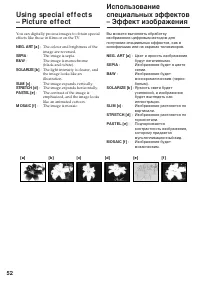
52 Using special effects– Picture effect You can digitally process images to obtain specialeffects like those in films or on the TV. NEG. ART [ a ] : The colour and brightness of the image are reversed. SEPIA : The image is sepia. B&W : The image is monochrome(black-and-white). SOLARIZE [ b ] : ...
стр. 49 - In CAMERA mode, select P EFFECT in; To cancel the picture effect function; Set P EFFECT to OFF in the menu settings.; While using the picture effect function; The picture effect is automatically canceled.; в установках меню; Если Вы выключите питание
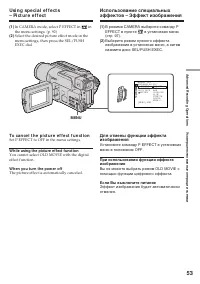
53 Advanced Recording Operations Усовершенствованные операции съемки ( 1 ) In CAMERA mode, select P EFFECT in in the menu settings. (p. 92) ( 2 ) Select the desired picture effect mode in themenu settings, then press the SEL/PUSHEXEC dial. To cancel the picture effect function Set P EFFECT to OFF in...
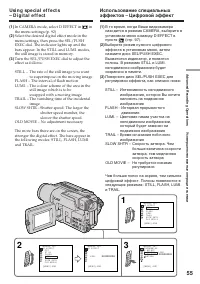
стр. 52 - To cancel the digital effect function
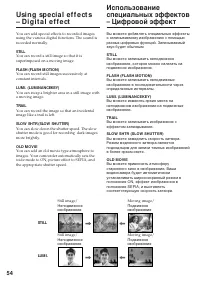
56 To cancel the digital effect function Set D EFFECT to OFF in the menu settings. Notes • The following functions do not work during digital effect:– Fader– Low lux mode of PROGRAM AE– Tape photo recording– Super NightShot • The PROGRAM AE function does not work in the slow shutter mode. • The foll...
стр. 53 - Spotlight
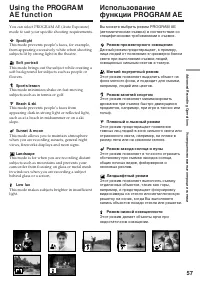
57 Advanced Recording Operations Усовершенствованные операции съемки Using the PROGRAMAE function You can select PROGRAM AE (Auto Exposure)mode to suit your specific shooting requirements. Spotlight This mode prevents people’s faces, for example,from appearing excessively white when shootingsubjects...
стр. 54 - In CAMERA mode, select PROGRAM AE in; To cancel the PROGRAM AE function; Using the PROGRAM AE function; Для отмены функции PROGRAM AE
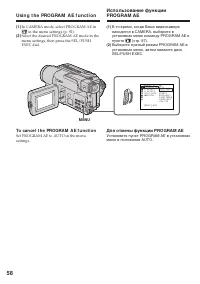
58 ( 1 ) In CAMERA mode, select PROGRAM AE in in the menu settings (p. 92). ( 2 ) Select the desired PROGRAM AE mode in themenu settings, then press the SEL/PUSHEXEC dial. To cancel the PROGRAM AE function Set PROGRAM AE to AUTO in the menusettings. Using the PROGRAM AE function Использование функци...
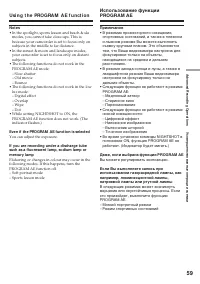
стр. 56 - faithfully; ночных сцен) с большой достоверностью; NIGHTSHOT в положение ON
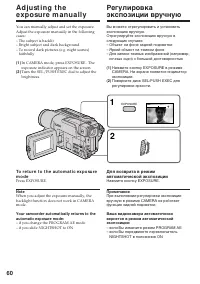
60 You can manually adjust and set the exposure.Adjust the exposure manually in the followingcases:– The subject is backlit– Bright subject and dark background– To record dark pictures (e.g. night scenes) faithfully ( 1 ) In CAMERA mode, press EXPOSURE . Theexposure indicator appears on the screen. ...
стр. 57 - such as walls and sky.; To return to the autofocus mode; Focusing manually; FOCUS; Фокусировка вручную; • Если Вы хотите выполнить изменение
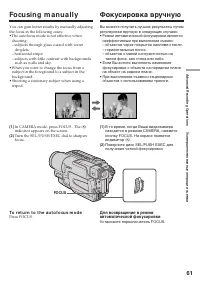
61 Advanced Recording Operations Усовершенствованные операции съемки You can gain better results by manually adjustingthe focus in the following cases:•The autofocus mode is not effective when shooting:– subjects through glass coated with water droplets. – horizontal stripe.– subjects with little co...
стр. 58 - Для точной фокусировки
62 To focus precisely Adjust the zoom by first focusing at the “T”(telephoto) position and then shooting at the “W”(wide-angle) position. This makes focusingeasier. When you shoot close to the subject Focus at the end of the “W” (wide-angle)position. 9 changes to the following indicators: when recor...
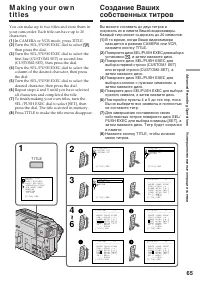
стр. 59 - Superimposing a title; VACATION; T I TLE; Наложение титра; Повторяйте пункты
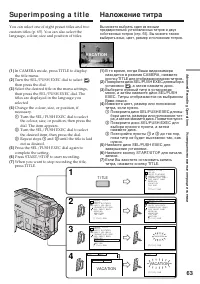
63 Advanced Recording Operations Усовершенствованные операции съемки Superimposing a title You can select one of eight preset titles and twocustom titles (p. 65). You can also select thelanguage, colour, size and position of titles. ( 1 ) In CAMERA mode, press TITLE to displaythe title menu. ( 2 ) T...
стр. 60 - To use the custom title; перед пунктом 2. Затем; Для использования собственного титра; • Цвет титра изменяется следующим; При выборе и установке титра; Зуммерный сигнал не будет звучать.; Во время воспроизведения
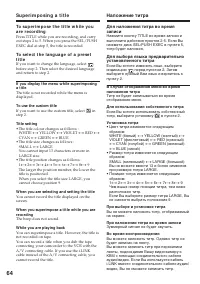
64 Superimposing a title To superimpose the title while youare recording Press TITLE while you are recording, and carryout steps 2 to 5. When you press the SEL/PUSHEXEC dial at step 5, the title is recorded. To select the language of a presettitle If you want to change the language, select before st...
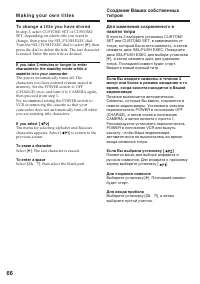
стр. 62 - To change a title you have stored; To erase a character; Making your own titles; Если Вы выбрали установку [
66 To change a title you have stored In step 3, select CUSTOM1 SET or CUSTOM2SET, depending on which title you want tochange, then press the SEL/PUSH EXEC dial.Turn the SEL/PUSH EXEC dial to select [ C ], then press the dial to delete the title. The last characteris erased. Enter the new title as de...
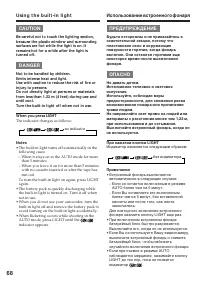
стр. 63 - To turn off the built-in light; Press LIGHT until the; LIGHT; не появится на экране,; Для выключения встроенного фонаря; не появится на экране.
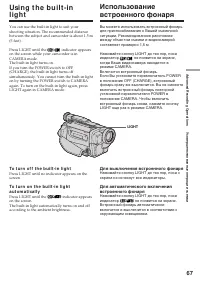
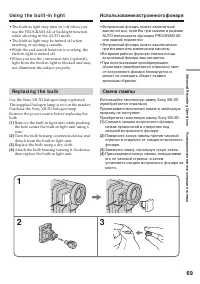
67 Advanced Recording Operations Усовершенствованные операции съемки Using the built-inlight You can use the built-in light to suit yourshooting situation. The recommended distancebetween the subject and camcorder is about 1.5 m(5 feet). Press LIGHT until the indicator appears on the screen while yo...
стр. 64 - When you press LIGHT; Using the built-in light; При нажатии кнопки LIGHT; Индикатор изменяется следующим образом:; Использование встроенного фонаря
68 CAUTION Be careful not to touch the lighting section,because the plastic window and surroundingsurfaces are hot while the light is on. Itremains hot for a while after the light isturned off. DANGER Not to be handled by children.Emits intense heat and light.Use with caution to reduce the risk of f...
стр. 65 - • The built-in light may turn on/off when you; Replacing the bulb; Replace the bulb using a dry cloth.; Во время работы функции поиска конца; Смена лампы
69 Advanced Recording Operations Усовершенствованные операции съемки 1 2 3 • The built-in light may turn on/off when you use the PROGRAM AE or backlight functionwhile shooting in the AUTO mode. • The built-in light may be turned off when inserting or ejecting a cassette. •While the end search functi...
стр. 66 - • When replacing the bulb, use only the Sony
70 Using the built-in light CAUTION • When replacing the bulb, use only the Sony XB-3D halogen lamp (optional) to reduce therisk of fire. • To prevent possible burn hazard, disconnect the power source before replacing and do nottouch the bulb until the bulb becomes coolenough to handle (for about 30...
стр. 67 - in the menu settings; • You cannot process externally input scenes; — Advanced Playback Operations —; — Усовершенствованные операции воспроизведения —; • Вы не можете видоизменять вводимые от
71 Advanced Playback Operations Усовершенствованные операции воспроизведения During playback, you can process a scene usingthe picture effect functions: NEG.ART, SEPIA,B&W and SOLARIZE. ( 1 ) In the playback or playback pause mode,select P EFFECT in in the menu settings (p. 92). ( 2 ) Select the...
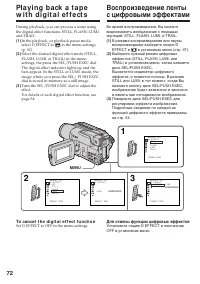
стр. 68 - Set D EFFECT to OFF in the menu settings.; Для отмены функции цифровых эффектов
72 During playback, you can process a scene usingthe digital effect functions: STILL, FLASH, LUMI.and TRAIL. ( 1 ) In the playback, or playback pause mode,select D EFFECT in in the menu settings (p. 92). ( 2 ) Select the desired digital effect mode (STILL,FLASH, LUMI. or TRAIL) in the menusettings, ...
стр. 70 - appears on the screen.; To cancel Tape PB ZOOM function; появится на дисплее.; Для отмены функции ленты PB ZOOM; Нажмите кнопку PB ZOOM.
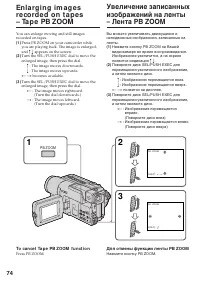
74 You can enlarge moving and still imagesrecorded on tapes. ( 1 ) Press PB ZOOM on your camcorder whileyou are playing back. The image is enlarged,and R r appears on the screen. ( 2 ) Turn the SEL/PUSH EXEC dial to move theenlarged image, then press the dial. R : The image moves downwards. r : The ...
стр. 71 - Pictures processed by Tape PB ZOOM function; • Вы не можете обрабатывать введенные с
75 Advanced Playback Operations Усовершенствованные операции воспроизведения Notes • You cannot process externally input scenes using Tape PB ZOOM function. • You cannot record pictures that you have processed using Tape PB ZOOM function withthis camcorder. To record pictures that youhave processed ...
стр. 73 - • When you press ZERO SET MEMORY before; • Если Вы нажмете кнопку ZERO SET
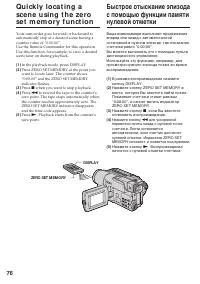
77 Advanced Playback Operations Усовершенствованные операции воспроизведения Quickly locating a scene usingthe zero set memory function Быстрое отыскание эпизода спомощью функции памятинулевой отметки Notes • When you press ZERO SET MEMORY before rewinding the tape, the zero set memoryfunction is ca...
стр. 75 - To stop searching; The date search function may not work correctly.; Для остановки поиска; Нажмите кнопку
79 Advanced Playback Operations Усовершенствованные операции воспроизведения Searching a recording by date– Date search To stop searching Press x . Note If one day’s recording is less than 2 minutes, yourcamcorder may not accurately find the pointwhere the recording date changes. If a tape has a bla...
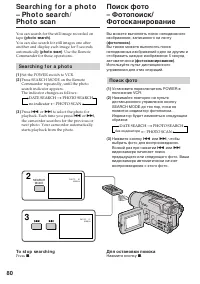
стр. 76 - Searching for a photo; Поиск фото
80 You can search for the still image recorded ontape (photo search) . You can also search for still images one afteranother and display each image for 5 secondsautomatically (photo scan) . Use the Remote Commander for these operations. Searching for a photo ( 1 ) Set the POWER switch to VCR. ( 2 ) ...
стр. 77 - Scanning photo; Set the POWER switch to VCR.; To stop scanning; Сканирование фото; Для остановки сканирования
81 Advanced Playback Operations Усовершенствованные операции воспроизведения Searching for a photo– Photo search/Photo scan Scanning photo ( 1 ) Set the POWER switch to VCR. ( 2 ) Press SEARCH MODE on the RemoteCommander repeatedly, until the photo scanindicator appears.The indicator changes as foll...
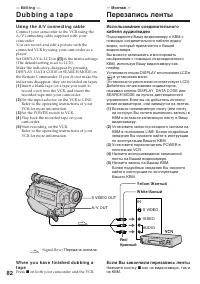
стр. 78 - Using the A/V connecting cable; — Editing —; Dubbing a tape; — Монтаж —; Перезапись ленты; Если Вы закончили перезапись ленты
82 Using the A/V connecting cable Connect your camcorder to the VCR using theA/V connecting cable supplied with yourcamcorder.You can record and edit a picture with theconnected VCR by using your camcorder as aplayer.Set DISPLAY to LCD in in the menu settings (The default setting is set to LCD).Make...
стр. 79 - mini; If your VCR is a monaural type; DV или Digital8; Если Ваш КВМ монофонического типа
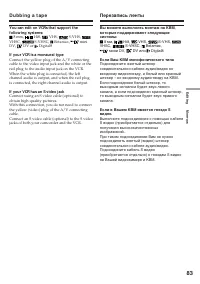
83 Editing Монтаж You can edit on VCRs that support thefollowing systems: 8 mm, Hi8, VHS, S-VHS, VHSC, S-VHSC, Betamax, mini DV, DV or Digital8 If your VCR is a monaural type Connect the yellow plug of the A/V connectingcable to the video input jack and the white or thered plug to the audio input ja...
стр. 80 - When you have finished dubbing a tape
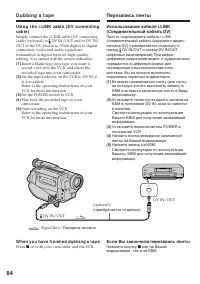
84 S VIDEO DV Using the i.LINK cable (DV connectingcable) Simply connect the i.LINK cable (DV connectingcable) (optional) to DV IN/OUT and to DV IN/OUT of the DV products. With digital-to-digitalconnection, video and audio signals aretransmitted in digital form for high-qualityediting. You cannot du...
стр. 81 - See page 120 for more information about i.LINK.; If you record a playback pause picture via the
85 Editing Монтаж Dubbing a tape Перезапись ленты You can connect one VCR only using the i.LINKcable (DV connecting cable). See page 120 for more information about i.LINK. The following functions do not work duringdigital editing: – Picture effect– Digital effect– Tape PB ZOOM If you record a playba...
стр. 82 - Recording from video; Запись с видео
86 You can record a tape from a VCR that has DVoutputs. Use your camcorder as a recorder.Simply connect the i.LINK cable (DV connectingcable) (optional) to DV IN/OUT and to DV IN/OUT of the DV products. With digital-to-digitalconnection, video and audio signals aretransmitted in digital form for hig...
стр. 83 - Во время цифрового монтажа
87 Editing Монтаж Recording from video Запись с видео Вы можете подсоединить только одинКВМ с помощью шнура i.LINK(соединительный кабель цифровоговидеосигнала). Во время цифрового монтажа Цвет на дисплее может быть неравномерным.Однако, это не влияет на записываемоеизображение. При записи изображени...
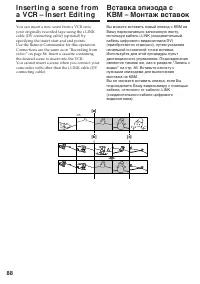
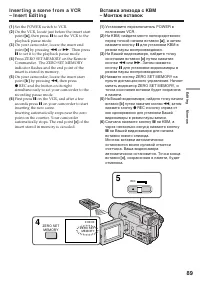
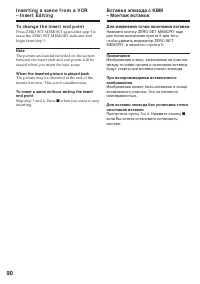
стр. 86 - To change the insert end point; Skip step 3 and 4. Press; Для изменения точки окончания вставки; Пропустите пукты 3 и 4. Нажмите кнопку
90 Inserting a scene from a VCR– Insert Editing Вставка эпизода с КВМ– Монтаж вставок To change the insert end point Press ZERO SET MEMORY again after step 5 toerase the ZERO SET MEMORY indicator andbegin from step 3. Note The picture and sound recorded on the sectionbetween the insert start and end...
стр. 87 - — Customizing Your Camcorder —; Changing the menu settings; Изменение установок меню
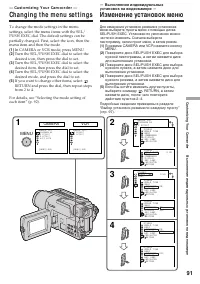
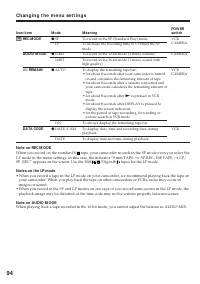
91 Customizing Your Camcorder Выполнение индивидуальных установок на видеокамере — Customizing Your Camcorder — Changing the menu settings To change the mode settings in the menusettings, select the menu items with the SEL/PUSH EXEC dial. The default settings can bepartially changed. First, select t...
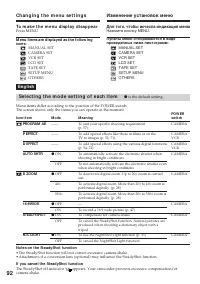
стр. 88 - Примечания по функции устойчивой съемки; функцию устойчивой съемки.; В случае отмены функции устойчивой съемки; Появится индиктор выключенной функции устойчивой съемки; Выбор установок режима по каждому пункту; установка по умолчанию.
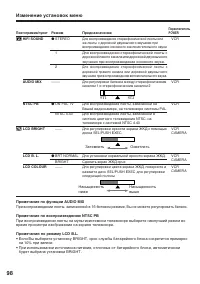
97 Customizing Your Camcorder Выполнение индивидуальных установок на видеокамере Пиктограмма/пункт PROGRAM AE P EFFECT D EFFECT AUTO SHTR D ZOOM 16:9WIDE STEADYSHOT N.S. LIGHT Режим —— —— —— z ON OFF z OFF 40 × 560 × z OFF ON z ON OFF z ON OFF Предназначение Для удовлетворения Ваших специфическихтре...
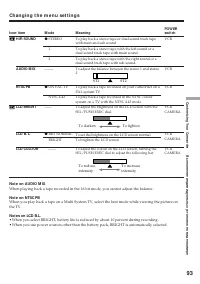
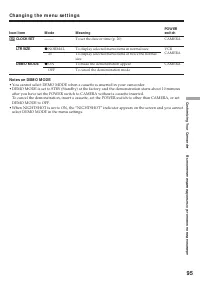
стр. 89 - Примечание по функции AUDIO MIX; будет выбрана установка BRIGHT.
98 Изменение установок меню Пиктограмма/пункт HiFi SOUND AUDIO MIX NTSC PB LCD BRIGHT LCD B. L. LCD COLOUR Режим z STEREO 1 2 ––––– z ON PAL TV NTSC 4.43 —— z BRT NORMAL BRIGHT —— Предназначение Для воспроизведения стереофонической ленты илиже ленты с дорожкой двуязычного звучания привоспроизведении...
стр. 90 - Примечание по режиму REC MODE; Digital для записи в режиме LP.; Примечания по режиму LP
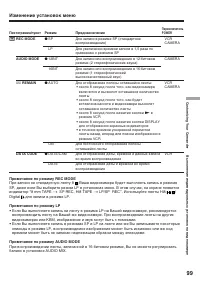
99 Customizing Your Camcorder Выполнение индивидуальных установок на видеокамере Изменение установок меню Пиктограмма/пункт REC MODE AUDIO MODE q REMAIN DATA CODE Режим z SP LP z 12BIT 16BIT z AUTO ON z DATE/CAM DATE Предназначение Для записи в режиме SP (стандартноевоспроизведение) Для увеличения в...
стр. 91 - Примечания по режиму DEMO MODE
100 Изменение установок меню Пиктограмма/пункт CLOCK SET LTR SIZE DEMO MODE Режим ––––– z NORMAL 2 × z ON OFF Предназначение Для пepeycтaнoвки даты или времени (стр. 20) Для отображения выбранных пунктов меню собычным размером Для отображения выбранных пунктов меню сразмером вдвое больше обычного Дл...
стр. 92 - Если после извлечения источника питания пройдет более 5 минут; 0 процентов во время записи.
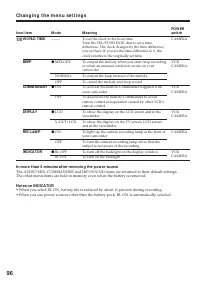
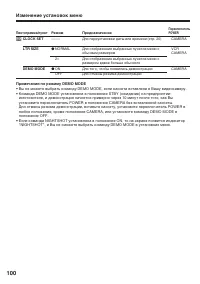
101 Customizing Your Camcorder Выполнение индивидуальных установок на видеокамере Изменение установок меню Пиктограмма/пункт WORLD TIME BEEP COMMANDER DISPLAY REC LAMP INDICATOR Режим ––––– z MELODY NORMAL OFF z ON OFF z LCD V-OUT/LCD z ON OFF z BL OFF BL ON Предназначение Для установки часов на мес...
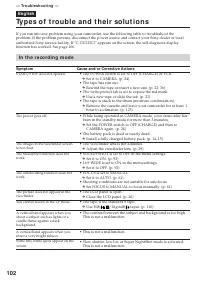
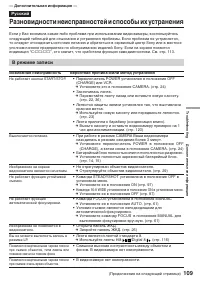
стр. 93 - В режиме записи; Возможная неисправность; Разновидности неисправностей и способы их устранения
109 Troubleshooting Дополнительная информация Если у Вас возникла какая-либо проблема при использовании видеокамеры, воспользуйтесьследующей таблицей для отыскания и устранения проблемы. Если проблема не устраняется,то следует отсоединить источник питания и обратиться в сервисный центр Sony или в ме...
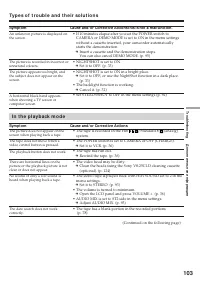
стр. 94 - В режиме воспроизведения
110 Разновидности неисправностей и способы их устранения Возможная неисправность Вероятная причина и/или метод устранения • Приведен в действие режим медленного затвора, низкой освещенности или ночной суперсъемки. В видеокамеренет неисправности. • Если пройдет 10 минут после того, как Вы установили ...
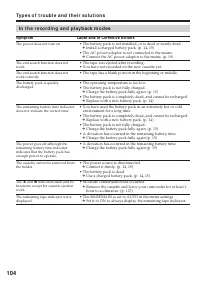
стр. 96 - Прочее
112 Прочее Возможная неисправность Вероятная причина и/или метод устранения • Команда COMMANDER установлена в положение OFF в установках меню. c Установите ее в положение ON. (стр. 101) • Что-то преграждает инфракрасные лучи. c Устраните препятствие. • Батарейки вставлены в держатель так, что полюса...
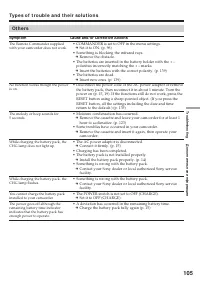
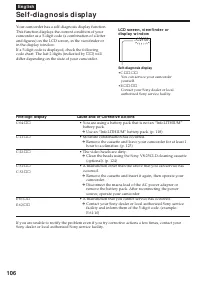
стр. 97 - Пятизначная индикация; Индикация самодиагностики
113 Troubleshooting Дополнительная информация Пятизначная индикация Вероятная причина и/или метод устранения • Вы используете батарейный блок, который не является батарейным блоком “InfoLITHIUM”. c Используйте батарейный блок “InfoLITHIUM” (стр. 118) • Произошла конденсация влаги. c Выньте кассету и...
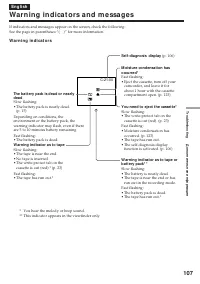
стр. 98 - Предупреждающие индикаторы; Предупреждающие индикаторы и сообщения; • Лента почти достигла конца
114 C:21:00 Если в видоискателе, на экране проверьте следующее:См. страницу в круглых скобках “( )” для более подробной информации. Предупреждающие индикаторы Предупреждающий индикаторотносительно ленты Медленное мигание:• Лента почти достигла конца.• Не вставлена кассета с лентой.• Лепесток защиты ...
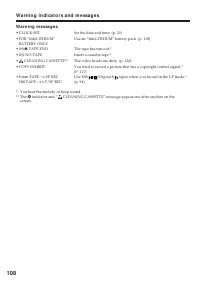
стр. 99 - Предупреждающие сообщения
115 Troubleshooting Дополнительная информация Предупреждающие сообщения • CLOCK SET Установите дату и время (стр. 20) • FOR “InfoLITHIUM” Используйте батарейный блок “InfoLITHIUM” (стр. 118) BATTERY ONLY • Q Z TAPE END Лента закончилась.* • Q NO TAPE Вставьте кассету.* • CLEANING CASSETTE** Загрязни...
стр. 100 - — Additional Information —; About video cassettes; What is the “Digital8 system”?; Playback system; Playing back an NTSC-recorded tape; О видеокассетах; Что такое “Цифровая система Digital8; Система воспроизведения
116 — Additional Information — About video cassettes What is the “Digital8 system”? This video system has been developed to enabledigital recording to Hi8 /Digital8 video cassette . Usable cassette tapes We recommend using Hi8 /Digital8 video cassette.If you use standard 8 tape, be sure to play back...
стр. 101 - When you play back; Сигнал авторского права; При воспроизведении; STEREO
117 Additional Information Дополнительная информация About video cassettes О видеокассетах Copyright signal When you play back Using any other video camera recorder, youcannot record on a tape that has recordedcopyright control signals for copyright protectionof software which is played back on your...
стр. 103 - Remaining battery time indicator; О батарейном блоке “InfoLITHIUM”; Иногда метка; Как хранить батарейный блок
119 Additional Information Дополнительная информация About the “InfoLITHIUM” batterypack Remaining battery time indicator • If the power goes off although the battery remaining indicator indicates that the batterypack has enough power to operate, charge thebattery pack fully again so that the indica...
стр. 104 - About the Name “i.LINK”; Относительно названия “i.LINK”
120 About i.LINK The DV jack on this unit is an i.LINK-compliantDV input/output jack. This section describes thei.LINK standard and its features. What is “i.LINK”? i.LINK is a digital serial interface for handlingdigital video, digital audio and other data in twodirections between equipment having t...
стр. 105 - i.LINK functions on this unit
121 Additional Information Дополнительная информация About i.LINK i.LINK Baud rate i.LINK’s maximum baud rate varies according tothe equipment. Three maximum baud rates aredefined: S100 (approx. 100Mbps*)S200 (approx. 200Mbps)S400 (approx. 400Mbps) The baud rate is listed under “Specifications” inth...
стр. 106 - Using your camcorder abroad; PAL system; Brazil; NTSC system; Бразилия; Система NTSC
122 Using your camcorder abroad You can use your camcorder in any country orarea with the AC power adaptor supplied withyour camcorder within 100 V to 240 V AC, 50/60Hz. Your camcorder is a PAL system basedcamcorder. If you want to view the playbackpicture on a TV, it must be a PAL system basedTV wi...
стр. 107 - Moisture condensation; If moisture condensation occurs; Note on moisture condensation; Конденсация влаги; Если произошла конденсация влаги; Примечание по конденсации влаги
123 Additional Information Дополнительная информация Maintenanceinformation andprecautions Moisture condensation If your camcorder is brought directly from a coldplace to a warm place, moisture may condenseinside your camcorder, on the surface of the tape,or on the lens. In this condition, the tape ...
стр. 108 - Maintenance information; Cleaning the LCD screen; indicator and “; Чистка экрана ЖКД
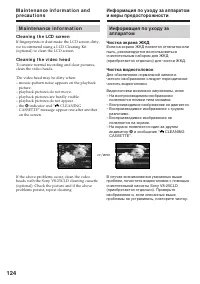
124 Maintenance information Cleaning the LCD screen If fingerprints or dust make the LCD screen dirty,we recommend using a LCD Cleaning Kit(optional) to clean the LCD screen. Cleaning the video head To ensure normal recording and clear pictures,clean the video heads. The video head may be dirty when...
стр. 109 - Remove the screw with a screwdriver (not; Caution; Отвинтите винт с помощью отвертки; Внимание
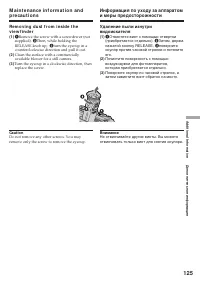
125 Additional Information Дополнительная информация Removing dust from inside theviewfinder ( 1 ) 1 Remove the screw with a screwdriver (not supplied). 2 Then, while holding the RELEASE knob up, 3 turn the eyecup in a counterclockwise direction and pull it out. ( 2 ) Clean the surface with a commer...
стр. 110 - Charging the built-in rechargeable lithium cell:; • Connect your camcorder to the mains using the
126 Charging the built-inrechargeable lithium cell Your camcorder is supplied with a built-inrechargeable lithium cell so as to retain the dateand time, etc., regardless of the setting of thePOWER switch. The rechargeable lithium cell isalways charged as long as you are using yourcamcorder. The cell...
стр. 111 - Precautions; Camcorder operation; Меры предосторожности; Эксплуатация видеокамеры
127 Additional Information Дополнительная информация Precautions Camcorder operation • Operate your camcorder on 7.2 V (battery pack) or 8.4 V (AC power adaptor). • For DC or AC operation, use the accessories recommended in this operating instructions. • If any solid object or liquid get inside the ...
стр. 112 - • Remove the tape, and periodically turn on the; Обращение с лентами; • Периодически вынимайте кассету и
128 Maintenance information andprecautions On handling tapes Do not insert anything into the small holes on therear of the cassette. These holes are used to sensethe type and thickness of the tape and if therecording tab is in or out. Camcorder care • Remove the tape, and periodically turn on the po...
стр. 113 - AC power adaptor
129 Additional Information Дополнительная информация AC power adaptor • Unplug the unit from the mains when you are not using the unit for a long time. Todisconnect the mains lead, pull it out by theplug. Never pull the mains lead itself. • Do not operate the unit with a damaged cord or if the unit ...
стр. 114 - If batteries are leaking
130 Maintenance information andprecautions Информация по уходу за аппаратоми меры предосторожности Батарейный блок • Используйте только рекомендуемое зарядное устройство или видеоаппаратуру сзарядной функцией. • Для предотвращения случайного короткого замыкания не допускайте контактаметаллических об...
стр. 115 - Технические характеристики; Видеокамера; Батарейный блок
132 Русский Технические характеристики Видеокамера Система Система видеозаписи 2 вращающиеся головкиСистема наклонноймеханической развертки Система аудиозаписи Вращающиеся головки, системаИКМДискретизация: 12 битов(Сдвиг частоты 32 кГц, стерео 1,стерео 2), 16 битов (Сдвигчастоты 48 кГц, стерео) Виде...
стр. 116 - — Quick Reference —; Camcorder; qs; qa
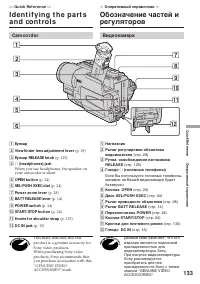
133 Quick Reference Оперативный справочник — Quick Reference — Identifying the partsand controls 1 Eyecup 2 Viewfinder lens adjustment lever (p. 29) 3 Eyecup RELEASE knob (p. 125) 4 i (headphones) jack When you use headphones, the speaker onyour camcorder is silent. 5 OPEN button (p. 24) 6 SEL/PUSH ...
стр. 117 - Identifying the parts and controls
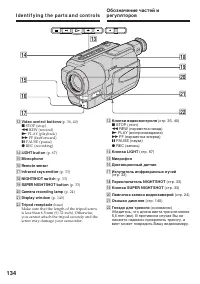
134 qd Video control buttons (p. 36, 40) x STOP (stop) m REW (rewind) N PLAY (playback) M FF (fastforward) X PAUSE (pause) z REC (recording) qf LIGHT button (p. 67) qg Microphone qh Remote sensor qj Infrared rays emitter (p. 33) qk NIGHTSHOT switch (p. 33) ql SUPER NIGHTSHOT button (p. 33) w; Camera...
стр. 119 - Attach the lens cap to the grip strap as illustrated.
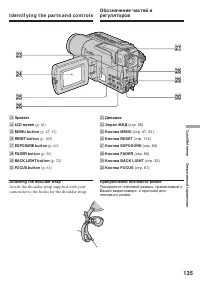
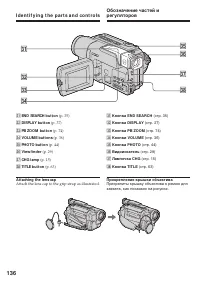
136 Identifying the parts and controls ea END SEARCH button (p. 35) es DISPLAY button (p. 37) ed PB ZOOM button (p. 74) ef VOLUME buttons (p. 36) eg PHOTO button (p. 44) eh Viewfinder (p. 29) ej CHG lamp (p. 15) ek TITLE button (p. 63) Attaching the lens cap Attach the lens cap to the grip strap as ...
стр. 120 - EJECT button; Fasten the grip strap firmly.; ra; Гнездо
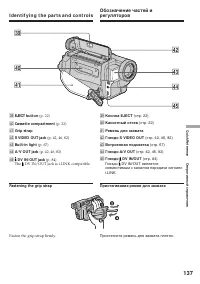
137 Quick Reference Оперативный справочник Identifying the parts and controls el EJECT button (p. 22) r; Cassette compartment (p. 22) ra Grip strap rs S VIDEO OUT jack (p. 42, 46, 82) rd Built-in light (p. 67) rf A/V OUT jack (p. 42, 46, 82) rg DV IN/OUT jack (p. 84) The DV IN/OUT jack is i.LINK com...
стр. 122 - To prepare the Remote Commander; Notes on the Remote Commander; • Point the remote sensor away from strong light
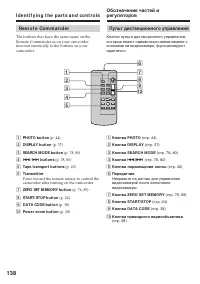
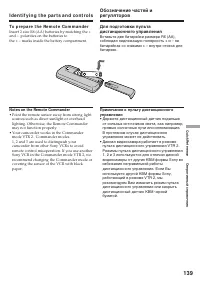
139 Quick Reference Оперативный справочник Identifying the parts and controls To prepare the Remote Commander Insert 2 size R6 (AA) batteries by matching the +and – polarities on the batteries tothe + – marks inside the battery compartment. Notes on the Remote Commander • Point the remote sensor awa...
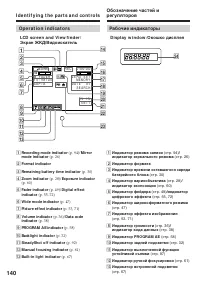
стр. 123 - Operation indicators; LCD screen and Viewfinder/; wf; Рабочие индикаторы
140 Operation indicators LCD screen and Viewfinder/ Экран ЖКД/Видоискатель Display window/ Окошко дисплея 1 Recording mode indicator (p. 94) /Mirror mode indicator (p. 26) 2 Format indicator 3 Remaining battery time indicator (p. 30) 4 Zoom indicator (p. 28) /Exposure indicator (p. 60) 5 Fader indic...
стр. 124 - This indicator appears in the viewfinder only.; В видоискателе появится индикатор.
141 Quick Reference Оперативный справочник qf STBY/REC indicator (p. 30) /Video control mode (p. 40) qg Tape counter indicator (p. 30, 76) /Time code indicator (p. 30) /Self-diagnosis display indicator (p. 106) /Tape photo recording indicator (p. 44) qh Remaining tape indicator (p. 30) qj ZERO SET M...
стр. 125 - Алфавитный указатель
143 Quick Reference Оперативный справочник Русский Алфавитный указатель А, Б, В, Г Батарейный блок .................. 14Батарейный блок “InfoLITHIUM” .............. 18, 118 Вариообъектив ...................... 28Введение/выведение изображения ....................... 49 Время записи ....................


 Sony CCD-TR2300E
Инструкция по эксплуатации
Sony CCD-TR2300E
Инструкция по эксплуатации
 Sony CCD-TR3100E
Инструкция по эксплуатации
Sony CCD-TR3100E
Инструкция по эксплуатации
 Sony CCD-TR311E
Инструкция по эксплуатации
Sony CCD-TR311E
Инструкция по эксплуатации
 Sony CCD-TR315E
Инструкция по эксплуатации
Sony CCD-TR315E
Инструкция по эксплуатации
 Sony CCD-TR317E
Инструкция по эксплуатации
Sony CCD-TR317E
Инструкция по эксплуатации
 Sony CCD-TR3300E
Инструкция по эксплуатации
Sony CCD-TR3300E
Инструкция по эксплуатации
 Sony CCD-TR3400E
Инструкция по эксплуатации
Sony CCD-TR3400E
Инструкция по эксплуатации
 Sony CCD-TR411E / CCD-TR412E
Инструкция по эксплуатации
Sony CCD-TR411E / CCD-TR412E
Инструкция по эксплуатации
 Sony CCD-TR415E
Инструкция по эксплуатации
Sony CCD-TR415E
Инструкция по эксплуатации
 Sony CCD-TR417E
Инструкция по эксплуатации
Sony CCD-TR417E
Инструкция по эксплуатации
 Sony CCD-TR425E
Инструкция по эксплуатации
Sony CCD-TR425E
Инструкция по эксплуатации
 Sony CCD-TR427E
Инструкция по эксплуатации
Sony CCD-TR427E
Инструкция по эксплуатации
 Sony CCD-TR501E / CCD-TR502E
Инструкция по эксплуатации
Sony CCD-TR501E / CCD-TR502E
Инструкция по эксплуатации
 Sony CCD-TR503E / CCD-TR506E
Инструкция по эксплуатации
Sony CCD-TR503E / CCD-TR506E
Инструкция по эксплуатации
 Sony CCD-TR511E / CCD-TR512E
Инструкция по эксплуатации
Sony CCD-TR511E / CCD-TR512E
Инструкция по эксплуатации
 Sony CCD-TR515E
Инструкция по эксплуатации
Sony CCD-TR515E
Инструкция по эксплуатации
 Sony CCD-TR516E
Инструкция по эксплуатации
Sony CCD-TR516E
Инструкция по эксплуатации
 Sony CCD-TR617E
Инструкция по эксплуатации
Sony CCD-TR617E
Инструкция по эксплуатации
 Sony CCD-TR618E
Инструкция по эксплуатации
Sony CCD-TR618E
Инструкция по эксплуатации