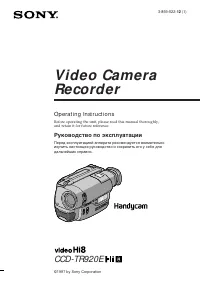
стр. 2 - English; camcorder. With your Handycam; WARNING; Русский
2 English Welcome! Congratulations on your purchase of this SonyHandycam ® camcorder. With your Handycam you can capture life’s precious moments withsuperior picture and sound quality.Your Handycam is loaded with advancedfeatures, but at the same time it is very easy touse. You will soon be producin...
стр. 3 - Русский язык; Содержание; Перед эксплуатацией аппарата
4 Русский язык Содержание Перед эксплуатацией аппарата О руководстве к аппарату ............................. 5Проверка комплектности поставки .............. 6 Подготовка к эксплуатации Зарядка и установка батарейного блока ........................................................................ 7 В...
стр. 4 - in the illustrations, you can; Note on TV colour systems; Using this manual; Precaution on copyright; • Do not let the camcorder get wet. Keep the; Об авторском праве; • Надо быть осторожным, чтобы видеокамера
Before you begin / Перед эксплуатацией аппара 5 As you read through this manual, buttons andsettings on the camcorder are shown in capitalletters.e.g. Set the POWER switch to CAMERA.As indicated with ≥ in the illustrations, you can hear the beep sound to confirm your operation. Note on TV colour sys...
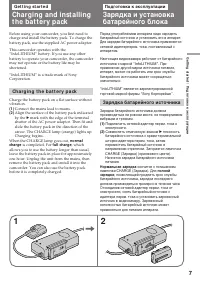
стр. 6 - Charging the battery pack; Connect the mains lead to mains.; normal; Getting started; Зарядка батарейного источника; Совместить отмеченную знаком; Нормальная зарядка; кончится с погашением; полной; , позволяющей продлить срок службы
7 Getting started / Подготовка к эксплуатации Before using your camcorder, you first need tocharge and install the battery pack. To charge thebattery pack, use the supplied AC power adaptor. This camcorder operates with the“InfoLITHIUM” battery. If you use any otherbattery to operate your camcorder,...
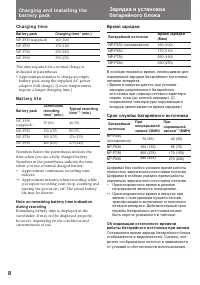
стр. 7 - Charging time; Battery life; Battery pack; Время зарядки; Срок службы батарейного источника; Время зарядки
8 Принепрерывнойзаписи ∗ (МИН) 70 (65) 150 (135) 305 (275) 480 (435) Принормальнойзаписи ∗∗ (МИН) 40 (35) 85 (75) 170 (155) 270 (245) Charging time Battery pack NP-F330 (supplied) NP-F530 NP-F730 NP-F930 The time required for a normal charge isindicated in parentheses. ∗ Approximate minutes to charg...
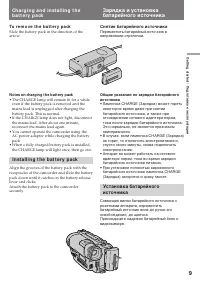
стр. 8 - To remove the battery pack; Notes on charging the battery pack; • The CHARGE lamp will remain lit for a while; Installing the battery pack; Снятие батарейного источника; • Аппарат не может работать на сетевого
9 Getting started / Подготовка к эксплуатации Charging and installing thebattery pack To remove the battery pack Slide the battery pack in the direction of thearrow. Notes on charging the battery pack • The CHARGE lamp will remain lit for a while even if the battery pack is removed and themains lead...
стр. 9 - Lift up the viewfinder.; Поднимите видоискатель.
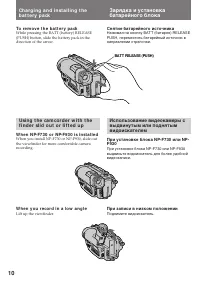
10 To remove the battery pack While pressing the BATT (battery) RELEASE(PUSH) button, slide the battery pack in thedirection of the arrow. Using the camcorder with thefinder slid out or lifted up When NP-F730 or NP-F930 is installed When you install NP-F730 or NP-P930, slide outthe viewfinder for mo...
стр. 10 - To restore the viewfinder; Note on the battery pack
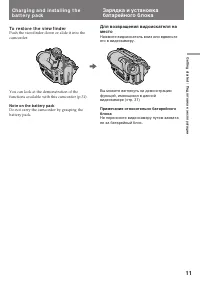
11 Getting started / Подготовка к эксплуатации Charging and installing thebattery pack Зарядка и установкабатарейного блока To restore the viewfinder Push the viewfinder down or slide it into thecamcorder. You can look at the demonstration of thefunctions available with this camcorder (p.31). Note o...
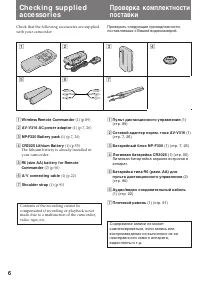
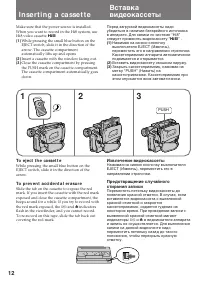
стр. 11 - Insert a cassette with the window facing out.; Inserting a cassette; Вставить видеокассету окошком наружу.; Извлечение видеокассеты; в видоискателе аппарата; To eject the cassette; and
12 Make sure that the power source is installed.When you want to record in the Hi8 system, useHi8 video cassette H . ( 1 ) While pressing the small blue button on theEJECT switch, slide it in the direction of thearrow. The cassette compartmentautomatically lifts up and opens. ( 2 ) Insert a cassette...
стр. 12 - AUTO DATE feature; Basic operations; Camera recording; . При записи одноразовых; функция AUTO DATE; Основные операции; Запись на видеокамере
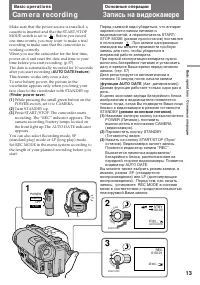
13 Basic operations / Основные операции Make sure that the power source is installed, acassette is inserted and that the START/STOPMODE switch is set to . Before you record one-time events, you may want to make a trialrecording to make sure that the camcorder isworking correctly.When you use the cam...
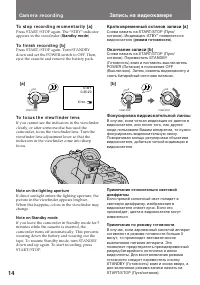
стр. 13 - Standby mode; To focus the viewfinder lens; Note on the lighting aperture; режим готовности; Фокусировка видоискательной линзы; Примечание по режиму готовности
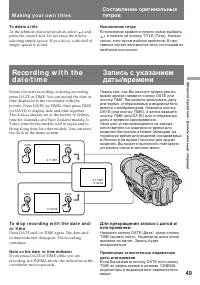
14 START/STOP LO CK S TA N D B Y STBY 0:35:20 40 min. Camera recording To stop recording momentarily [a] Press START/STOP again. The “STBY” indicatorappears in the viewfinder ( Standby mode ). To finish recording [b] Press START/STOP again. Turn STANDBYdown and set the POWER switch to OFF. Then,ejec...
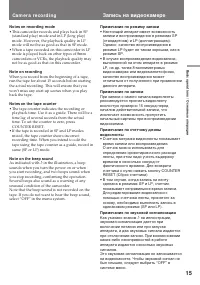
стр. 14 - Notes on recording mode; • Настоящий аппарат имеет возможность; Примечание по записи; • Счетчик метража видеоленты показывает; Примечание по звуковой сигнализации; Как указано знаком
15 Basic operations / Основные операции Notes on recording mode • This camcorder records and plays back in SP (standard play) mode and in LP (long play)mode. However, the playback quality in LPmode will not be as good as that in SP mode. • When a tape recorded on this camcorder in LP mode is played ...
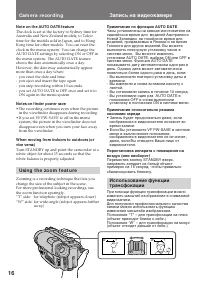
стр. 15 - Note on the AUTO DATE feature; ON again in the menu system.; Notes on finder power save; • The recording continues even when the picture; Using the zoom feature; Примечание по функции AUTO DATE; - Вы извлекли и снова вставили кассету с
16 Camera recording Note on the AUTO DATE feature The clock is set at the factory to Sydney time forAustralia and New Zealand models, to Tokyotime for the models sold in Japan, and to HongKong time for other models. You can reset theclock in the menu system. You can change theAUTO DATE settings by s...
стр. 16 - Notes on digital zoom; • Трансфокация с увеличением больше 15х
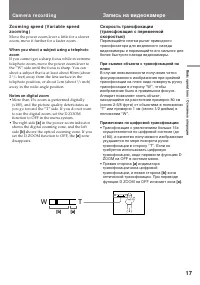
17 Basic operations / Основные операции [a] [b] T W T W Zooming speed (Variable speedzooming) Move the power zoom lever a little for a slowerzoom, move it further for a faster zoom. When you shoot a subject using a telephotozoom If you cannot get a sharp focus while in extremetelephoto zoom, move th...
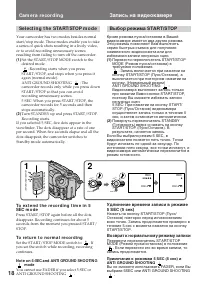
стр. 17 - Selecting the START/STOP mode; : Recording starts when you press; Выбор режима START/STOP; : Запись включается при нажатии на; To return to normal recording; Set the START/STOP MODE switch to; Note on 5-SEC and ANTI GROUND SHOOTING; Возврат к нормальному режиму записи
18 START/STOP LO CK S TA N D B Y START/STOP LO CK S TA N D B Y 1 2 40min. REC 40min. REC ANTI GROUND SHOOTING START/STOP MODE Camera recording Запись на видеокамере Selecting the START/STOP mode Your camcorder has two modes besides normalstart/stop mode. These modes enable you to takea series of qui...
стр. 18 - • Hold the camcorder firmly and secure it with
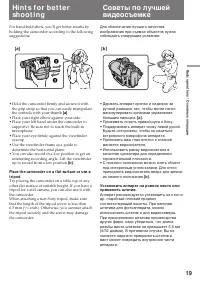
19 Basic operations / Основные операции 2 3 1 For hand-held shots, you’ll get better results byholding the camcorder according to the followingsuggestions: • Hold the camcorder firmly and secure it with the grip strap so that you can easily manipulatethe controls with your thumb [a] . • Place your r...
стр. 19 - Cautions on the viewfinder; • Do not pick up the camcorder by the; Общие указания по видоискателю; • Аппарат нельзя переносить, захватывая за; Hints for better shooting
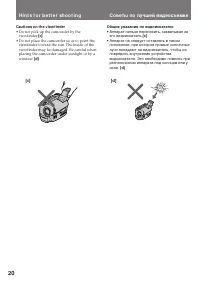
20 Cautions on the viewfinder • Do not pick up the camcorder by the viewfinder [c] . • Do not place the camcorder so as to point the viewfinder toward the sun. The inside of theviewfinder may be damaged. Be careful whenplacing the camcorder under sunlight or by awindow [d] . Общие указания по видоис...
стр. 20 - Rec Review; Для останова воспроизведения
21 Basic operations / Основные операции Checking therecorded picture Using EDITSEARCH, you can review the lastrecorded scene or check the recorded picture inthe viewfinder. ( 1 ) While pressing the small green button on thePOWER switch, set it to CAMERA. ( 2 ) Turn STANDBY up. ( 3 ) Press the – ( Œ ...
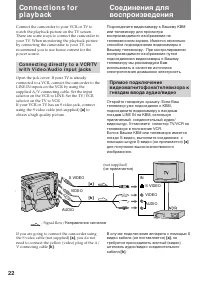
стр. 22 - If your VCR or TV is a monaural type; Connections for playback
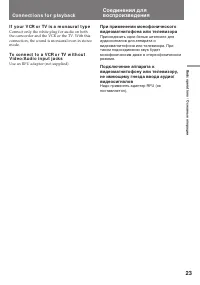
23 Basic operations / Основные операции If your VCR or TV is a monaural type Connect only the white plug for audio on boththe camcorder and the VCR or the TV. With thisconnection, the sound is monaural even in stereomode. To connect to a VCR or TV withoutVideo/Audio input jacks Use an RFU adaptor (n...
стр. 23 - Playing back a tape; Press; To stop playback; Using the remote commander; Для отключения режима воспроизведения; С пульта дистанционного управления
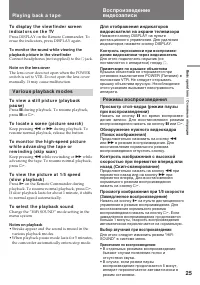
24 Playing back a tape You can monitor the playback picture in theviewfinder. You can also monitor a picture on aTV screen, after connecting the camcorder to aTV or VCR. ( 1 ) While pressing the small green button on thePOWER switch, set it to VTR. The videocontrol buttons light up. ( 2 ) Insert the...
стр. 24 - Note on the lens cover; Various playback modes; To select the playback sound; Notes on playback; Режимы воспроизведения; Выбор звучания при воспроизведении; Примечания по воспроизведению
25 Basic operations / Основные операции Playing back a tape To display the viewfinder screenindicators on the TV Press DISPLAY on the Remote Commander. Toerase the indicators, press DISPLAY again. To monitor the sound while viewing theplayback picture in the viewfinder Connect headphones (not suppli...
стр. 25 - Note on power sources; Advanced operations; Место; Примечание по источникам питания
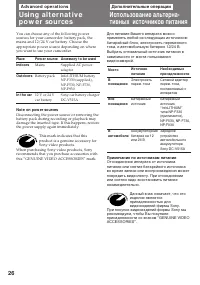
26 You can choose any of the following powersources for your camcorder: battery pack, themains and 12/24 V car battery. Choose theappropriate power source depending on whereyou want to use your camcorder. Place Indoors Outdoors In the car Note on power sources Disconnecting the power source or remov...
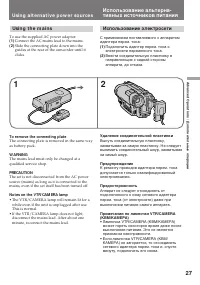
стр. 26 - Using alternative power sources; Удаление соединительной пластинки; • The VTR/CAMERA lamp will remain lit for a; Using the mains; To use the supplied AC power adaptor:; Использование электросети
27 Advanced Operations / Дополнительные операции Using alternative power sources Использование альтерна-тивных источников питания Удаление соединительной пластинки Вынуть соединительную пластинку,захватывая за самую пластинку. Не следуетвынимать соединительный шнур, захватываяза самый шнур. Предупре...
стр. 27 - To remove the car battery charger
28 Using alternative power sources Using a car battery Use Sony DC-V515A car battery charger (notsupplied). Connect the car battery cord to thecigarette lighter socket of a car (12 V or 24 V).Connect the car battery charger and thecamcorder in the same way as you connect theAC power adaptor. To remo...
стр. 28 - Press MENU to display the menu.
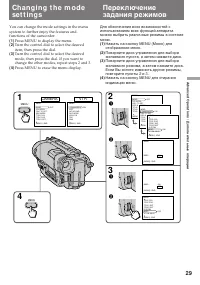
29 Advanced Operations / Дополнительные операции Changing the modesettings You can change the mode settings in the menusystem to further enjoy the features andfunctions of the camcorder. ( 1 ) Press MENU to display the menu. ( 2 ) Turn the control dial to select the desireditem, then press the dial....
стр. 29 - Changing the mode settings; REC MODE; Items for CAMERA mode only; ORC TO SET
30 Changing the mode settings Переключение заданиярежимов Выбор отдельных позицийзадаваемых режимов Позиции для режимов CAMERA(Видеокамера) и VTR (КВМ) COMMANDER <ON/OFF> (Дист. управление<ВКЛ/ВЫКЛ> • Выбрать ON при дистанционном управлении аппаратом с поставляемого с ним пульта. • Выбра...
стр. 30 - TITLE 1 SET; Выбрать ваш оригинальны титр.
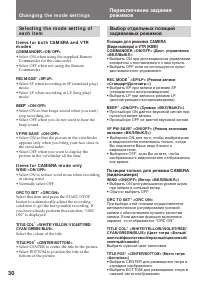
31 Advanced Operations / Дополнительные операции TITLE 1 SET ∗ TITLE 2 SET ∗ Select to store your own original titles. D ZOOM ∗ <ON/OFF> • Select ON to activate digital zooming.• Select OFF not to use the digital zoom. The camera goes back to 15x zoom. REC LAMP ∗ <ON/OFF> • Select OFF wh...
стр. 31 - Items for VTR mode only; • Select ON to minimize picture deterioration; NTSC PB; the signal of a TV game or similar machine.; DNR; These settings are retained even when the; Примечание относительно установки TBC
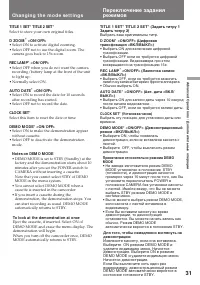
32 Changing the mode settings Items for VTR mode only EDIT <ON/OFF> • Select ON to minimize picture deterioration when editing. • Normally select OFF. HiFi SOUND <STEREO/1/2> • Normally select STEREO.• Select 1 or 2 to play back a dual sound track tape. NTSC PB ∗ <ON PAL TV/NTSC 4.43&...
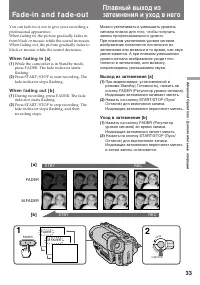
стр. 33 - • While fading in or fading out, you cannot; Примечания относительно титров; • В режиме введения или выведения
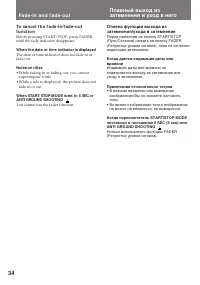
34 To cancel the fade-in/fade-outfunction Before pressing START/STOP, press FADERuntil the fade indicator disappears. When the date or time indicator is displayed The date or time indicator does not fade in orfade out. Notes on titles • While fading in or fading out, you cannot superimpose a title. ...
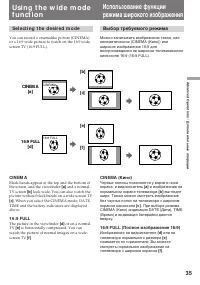
стр. 34 - Selecting the desired mode; CINEMA; Выбор требуемого режима
35 Advanced Operations / Дополнительные операции [b] CINEMA [a] [c] [e] [f] CINEMA 16:9 FULL 16:9 FULL [d] Selecting the desired mode You can record a cinemalike picture (CINEMA)or a 16:9 wide picture to watch on the 16:9 wide-screen TV (16:9 FULL). CINEMA Black bands appear at the top and the botto...
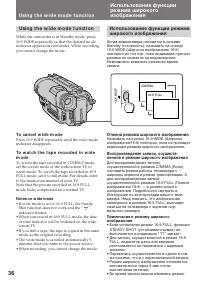
стр. 35 - To cancel wide mode; Notes on wide mode; Отмена режима широкого изображения; Using the wide mode function
36 16:9 FULL CINEMA 16:9 WIDE Using the wide mode function While the camcorder is in Standby mode, press16:9 WIDE repeatedly so that the desired modeindicator appears in viewfinder. While recording,you cannot change the mode. To cancel wide mode Press 16:9 WIDE repeatedly until the wide modeindicato...
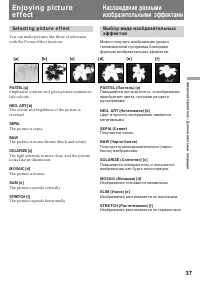
стр. 36 - Selecting picture effect; SEPIA; The picture is sepia.
37 Advanced Operations / Дополнительные операции Enjoying pictureeffect Selecting picture effect You can make pictures like those of televisionwith the Picture Effect function. PASTEL [a] Emphasize contrast and gives picture animation-like colours. NEG. ART [b] The colour and brightness of the pictu...
стр. 37 - Using picture effect function; Press PICTURE EFFECT.; To turn off picture effect; Note on the picture effect; Enjoying picture effect; Отмена изобразительных эффектов
38 Using picture effect function ( 1 ) Press PICTURE EFFECT. ( 2 ) Turn the control dial to select the desiredpicture effect mode. To turn off picture effect Press PICTURE EFFECT. The indicator in theviewfinder goes out. Note on the picture effect When you turn the power off, the camcorderreturns au...
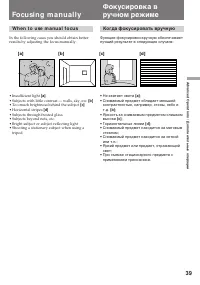
стр. 38 - Focusing manually; When to use manual focus; • Insufficient light; Когда фокусировать вручную
39 Advanced Operations / Дополнительные операции Focusing manually When to use manual focus In the following cases you should obtain betterresults by adjusting the focus manually. • Insufficient light [a] • Subjects with little contrast — walls, sky, etc. [b] • Too much brightness behind the subject...
стр. 39 - Съемка в относительно темных местах; Примечание к фокусировке в ручном режиме:; Могут появиться следующие индикаторы:; To return to autofocus mode; Shooting in relatively dark places; To record a very distant subject; Note on manual focusing
40 2 3 1 T W 4 T W W T W T NEAR FAR FOCUS AUTO MANUAL INFINITY Focusing manually When focusing manually, first focus in telephotobefore recording, and then reset the shot length. ( 1 ) Set FOCUS to MANUAL. The f indicator appears in the viewfinder. ( 2 ) Move the power zoom lever to the “T” sideunti...
стр. 40 - Selecting the best mode; Spotlight mode; Выбор оптимального режима; Режим подсветки прожектором
41 Advanced Operations / Дополнительные операции Selecting the best mode You can select one of six PROGRAM AE (AutoExposure) modes to suit your shooting situation,referring to the following. Spotlight mode For subjects in spotlight, such as at the theatre ora formal event. a Soft portrait mode For z...
стр. 41 - Using the PROGRAM AE function; To turn off program AE; Notes on focus setting; • In the Spotlight, Sports lesson and Beach & Ski; Note on PROGRAM AE; • В режиме прожекторного освещения,
42 Using the PROGRAM AE function ( 1 ) Press PROGRAM AE. ( 2 ) Turn the control dial to select the desiredPROGRAM AE mode. To turn off program AE Press PROGRAM AE. Notes on focus setting • In the Spotlight, Sports lesson and Beach & Ski modes, you cannot take close-ups because thecamcorder is se...
стр. 42 - After shooting; • Предмет находится близко к источнику; Для выполнения тонкой регулировки
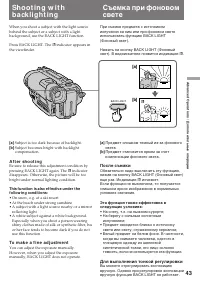
43 Advanced Operations / Дополнительные операции Shooting withbacklighting When you shoot a subject with the light sourcebehind the subject or a subject with a lightbackground, use the BACK LIGHT function. Press BACK LIGHT. The c indicator appears in the viewfinder. [a] Subject is too dark because o...
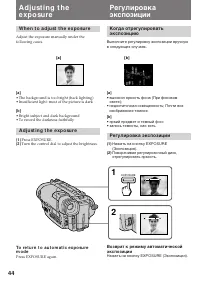
стр. 43 - Turn the control dial to adjust the brightness.; Регулировка экспозиции
44 Adjusting theexposure When to adjust the exposure Adjust the exposure manually under thefollowing cases. [a] • The background is too bright (back lighting)• Insufficient light: most of the picture is dark [b] • Bright subject and dark background• To record the darkness faithfully Adjusting the ex...
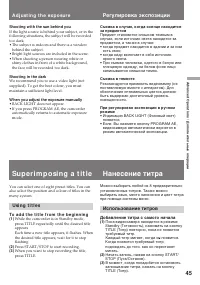
стр. 44 - Shooting with the sun behind you; Adjusting the exposure; • когда кадр включает в себя источник; Съемка в темноте; • Если Вы нажмете кнопку PROGRAM AE,; Superimposing a title; Using titles; To add the title from the beginning; Использование титров; Добавление титра с самого начала
45 Advanced Operations / Дополнительные операции Shooting with the sun behind you If the light source is behind your subject, or in thefollowing situations, the subject will be recordedtoo dark.• The subject is indoors and there is a window behind the subject. • Bright light sources are included in ...
стр. 45 - Добавление титра во время записи; Titles cycle as follows:; Примечания к нанесению титра:; Нанесение титра
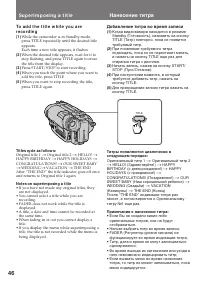
46 To add the title while you arerecording ( 1 ) While the camcorder is in Standby mode,press TITLE repeatedly until the desired titleappears.Each time a new title appears, it flashes. ( 2 ) When the desired title appears, wait for it tostop flashing, and press TITLE again to erasethe title from the...
стр. 46 - To select the colour of the title; Выбор цвета титра; TITLE COL
47 Advanced Operations / Дополнительные операции To select the colour of the title ( 1 ) While the camcorder is in Standby mode,press MENU to display the menu. ( 2 ) Turn the control dial to select TITLE COL,then press the dial. ( 3 ) Turn the control dial to select the desiredcolour, then press the...
стр. 47 - To edit the title you have stored; When you enter 22 letters in step 4; Редактирование запомненного титра
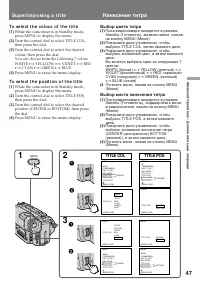
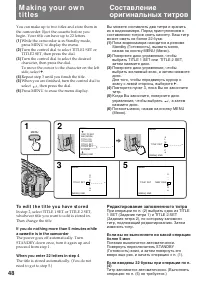
48 Making your owntitles You can make up to two titles and store them inthe camcorder. Eject the cassette before youbegin. Your title can have up to 22 letters. ( 1 ) While the camcorder is in Standby mode,press MENU to display the menu. ( 2 ) Turn the control dial to select TITLE1 SET orTITLE2 SET,...
стр. 48 - To delete a title; At the leftmost character position, select; Исключение титра; В положении крайнего левого знака выбрать; Note on the date or time indicator; Making your own titles
49 Advanced Operations / Дополнительные операции To delete a title At the leftmost character position, select and press the control dial. Do not erase the title byselecting empty spaces. If you do so, a title full ofempty spaces is stored. Исключение титра В положении крайнего левого знака выбрать и...
стр. 49 - • When you set ORC TO SET, the recording on; Если кассета извлечена; • Если Вы выполните установку ORC TO
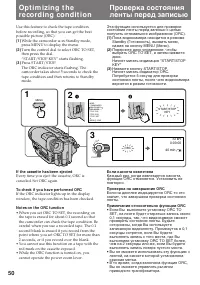
50 Use this feature to check the tape conditionbefore recording, so that you can get the bestpossible picture (ORC). ( 1 ) While the camcorder is in Standby mode,press MENU to display the menu. ( 2 ) Turn the control dial to select ORC TO SET,then press the dial.“START/STOP KEY” starts flashing. ( 3...
стр. 50 - or; Before editing; Set EDIT to ON in the menu system.; Перед редактированием; Направление сигнала
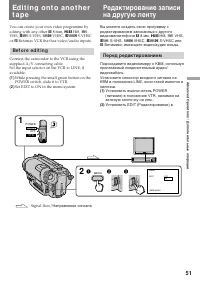
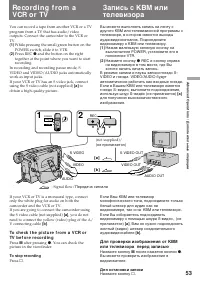
51 Advanced Operations / Дополнительные операции Editing onto anothertape You can create your own video programme byediting with any other h 8 mm, H Hi8, j VHS, k S-VHS, VHSC, K S-VHSC or l Betamax VCR that has video/audio inputs. Before editing Connect the camcorder to the VCR using thesupplied A...
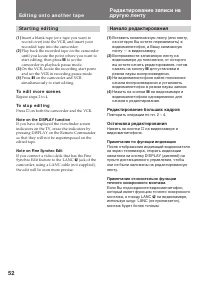
стр. 51 - Starting editing; To edit more scenes; Note on the DISPLAY function; Начало редактирования; Редактирование больших кадров; Примечание по функции индикации; Editing onto another tape
52 Starting editing ( 1 ) Insert a blank tape (or a tape you want torecord over) into the VCR, and insert yourrecorded tape into the camcorder. ( 2 ) Play back the recorded tape on the camcorderuntil you locate the point where you want tostart editing, then press P to set the camcorder in playback p...
стр. 52 - To stop recording
53 Advanced Operations / Дополнительные операции You can record a tape from another VCR or a TVprogram from a TV that has audio/videooutputs. Connect the camcorder to the VCR orTV. ( 1 ) While pressing the small green button on thePOWER switch, slide it to VTR. ( 2 ) Press REC r and the button on th...
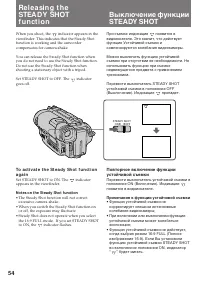
стр. 53 - Notes on the Steady Shot function; При съемке индикация; Примечания к функции устойчивой съемки; • Функция устойчивой съемки не
54 When you shoot, the indicator appears in the viewfinder. This indicates that the Steady Shotfunction is working and the camcordercompensates for camera-shake. You can release the Steady Shot function whenyou do not need to use the Steady Shot function.Do not use the Steady Shot function whenshoot...
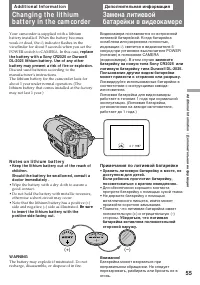
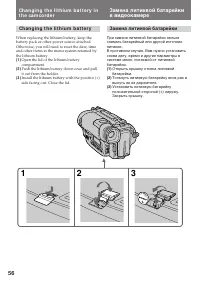
стр. 54 - indicator flashes in the; replace; Additional Information; светится в видоискателе 5; замените; Примечания по литиевой батарейке; • Хранить литиевую батарейку в месте, не; • Для обеспечения хорошего контакта; Убедиться, что литиевая; Notes on lithium battery; • Wipe the battery with a dry cloth to assure a; Be sure
55 Additional Information / Дополнительная информация (+) (--) - Your camcorder is supplied with a lithiumbattery installed. When the battery becomesweak or dead, the I indicator flashes in the viewfinder for about 5 seconds when you set thePOWER switch to CAMERA. In this case, replace the battery w...
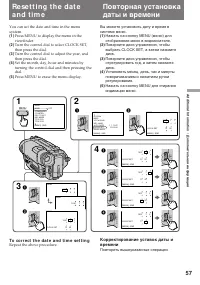
стр. 56 - Press MENU to erase the menu display.; To correct the date and time setting; Repeat the above procedure.
57 Additional Information / Дополнительная информация Resetting the dateand time You can set the date and time in the menusystem. ( 1 ) Press MENU to display the menu in theviewfinder. ( 2 ) Turn the control dial to select CLOCK SET,then press the dial. ( 3 ) Turn the control dial to adjust the year...
стр. 57 - To check the preset date and time; The year indicator changes as follows:; Выбор типов кассет
58 To check the preset date and time Press DATE to display the date indicator in theviewfinder.Press TIME to display the time indicator.Press DATE and TIME to display the date andtime indicators. When you press the same buttonagain, the indicator goes off. The year indicator changes as follows: Note...
стр. 58 - When you play back; Note on AFM HiFi stereo; • You record the tape on an AFM HiFi monaural; Foreign 8 mm video; Playing back an NTSC-recorded tape; • The playback picture in the viewfinder will be; Иностранные 8-мм ленты; • Воспроизводимое в видоискателе
59 Additional Information / Дополнительная информация When you play back The playback mode (SP/LP) and system (Hi8/standard 8 mm) are selected automaticallyaccording to the format in which the tape hasbeen recorded. The quality of the recordedpicture in LP mode, however, will not be as goodas that i...
стр. 59 - Preparing the battery pack; Always carry additional batteries
60 • You cannot play back a tape recorded in NTSC video system with LP mode neither in theviewfinder nor on a TV screen. • If a tape has portions recorded in PAL and NTSC video systems, the tape counter readingis not correct. This discrepancy is due to thedifference between the counting cycle of the...
стр. 60 - Tips for using the battery pack; в видоискателе; Общее указание; Нагрев батарейного источника; indicator appears and starts; Caution
61 Additional Information / Дополнительная информация Tips for using the battery pack When to replace the batterypack While you are using your camcorder, theremaining battery indicator in the viewfinderdecreases gradually as battery power is used up.Remaining time in minutes appears. Рекомендации по...
стр. 61 - Battery pack care; and keep it in a cool; Be sure to observe the following; • Do not expose the battery pack to any; Уход за батарейным источником; и сохранять его в; The switch on the battery pack
62 Battery pack care • Remove the battery pack from thecamcorder after using it, and keep it in a cool place. When the battery pack is installed to thecamcorder, a small amount of current flows tothe camcorder even if the POWER switch is setto OFF. This shortens battery life. • The battery pack is a...
стр. 62 - What is the “InfoLITHIUM”; indicator may also flash under some condition.; Что такое “InfoLITHIUM”; также может мигать при
63 Additional Information / Дополнительная информация Tips for using the battery pack Рекомендации по применениюбатарейного источника Notes on the “InfoLITHIUM”battery pack What is the “InfoLITHIUM” The “InfoLITHIUM” is a lithium ion battery packwhich can exchange data with compatible videoequipment...
стр. 63 - Примечания по зарядке; Батарейный источник новой марки; • After you have used the “InfoLITHIUM”; Notes on charging; A brand-new battery pack; • После того, как Вы использовали
64 Примечания по зарядке Батарейный источник новой марки Б а т а р е й н ы й и с т о ч н и к н о в о й м а р к и н ез а р я ж е н . П е р е д п р и м е н е н и е мбатарейного источника зарядить егополностью. Перезарядка батарейногоисточника при необходимости Б а т а р е й н ы й и с т о ч н и к н е т...
стр. 64 - Notes on the terminals
65 Additional Information / Дополнительная информация Notes on the terminals If the terminals (metal parts on the back) arenot clean, the battery charge duration will beshortened. When the terminals are not clean or when thebattery pack has not been used for a long time,repeatedly install and remove...
стр. 65 - Moisture condensation; Inside the camcorder; indicator flashes. If this; On the lens; Конденсация влаги; В видеокамере; не; На объективе
66 Maintenance informationand precautions Moisture condensation If the camcorder is brought directly from a coldplace to a warm place, moisture may condenseinside the camcorder, on the surface of the tape,or on the lens. In this condition, the tape maystick to the head drum and be damaged or theunit...
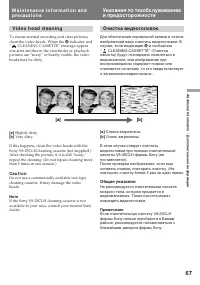
стр. 66 - Video head cleaning; indicator and; Очистка видеоголовок; и сообщение; Общие указания; Примечание; Slightly dirty; Note
67 Additional Information / Дополнительная информация Video head cleaning To ensure normal recording and clear pictures,clean the video heads. When the v indicator and “ CLEANING CASSETTE” message appear one after another in the viewfinder or playbackpictures are “noisy” or hardly visible, the video...
стр. 67 - По эксплуатации видеокамеры; Precautions; Camcorder operation
68 Общие указания По эксплуатации видеокамеры • Видеокамера должна питаться от тока напряжением 7,2 В (от батарейногоисточника) или 8,4 В (от сетевого адаптераперем. тока). • Для эксплуатации на напряжении питания постоянного или переменного тока следуетприменять принадлежности,рекомендуемые в насто...
стр. 68 - AC power adaptor; Charging; Сетевой адаптер перем. тока; Зарядка
69 Additional Information / Дополнительная информация AC power adaptor Charging • Use only a lithium ion type battery pack.• Place the battery pack on a flat surface without vibration during charging. • The battery pack will get hot during charging. This is normal. Others • Unplug the unit from the ...
стр. 69 - Notes on dry batteries; соблюдением полярности.
70 Notes on dry batteries To avoid possible damage from battery leakageor corrosion, observe the following.• Be sure to insert the batteries in the correct direction. • Dry batteries are not rechargeable.• Do not use a combination of new and old batteries. • Do not use different types of batteries.•...
стр. 70 - Power sources; PAL system; Brazil; NTSC system; Источник питания; Система PAL; Бразилия; Система NTSC
71 Additional Information / Дополнительная информация Using your camcorderabroad Each country or area has its own electric and TVcolour systems. Before using your camcorderabroad, check the following points. Power sources You can use your camcorder in any country orarea with the supplied AC power ad...
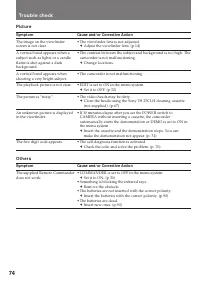
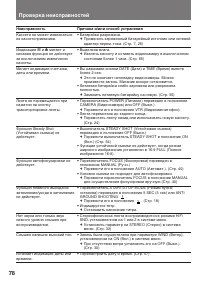
стр. 71 - Проверка неисправностей; Причина и/или способ устранения; Видеокамера; Питание; Операции управления; Неисправность
77 Additional Information / Дополнительная информация Русский Проверка неисправностей Причина и/или способ устранения • Батарейный источник не установлен. m Установить батарейный источник. (Стр. 9) • Батарейный источник разряжен. m Применить заряженный батарейный источник. (Стр. 7) • Сетевой адаптер...
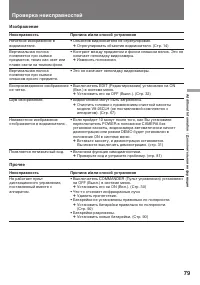
стр. 73 - Изображение; Прочее
79 Additional Information / Дополнительная информация Изображение Неисправность Нечеткое изображение ввидоискателе. Вертикальная полосапоявляется при съемкепредметов, таких как свет илипламя свечи на темном фоне. Вертикальная полосапоявляется при съемкеслишком яркого предмета. Воспроизведенное изобр...
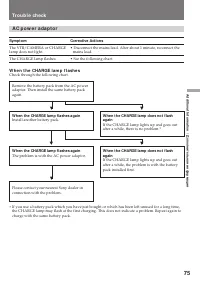
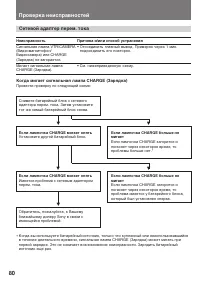
стр. 74 - Когда мигает сигнальная лампа CHARGE (Зарядка); Провести проверку по следующей схеме:; • Отсоединить главный вывод. Примерно через 1 мин.; Если лампочка CHARGE мигает опять; Установите другой батарейный блок.
80 Сетевой адаптер перем. тока Неисправность Сигнальная лампа VTR/CAMERA(Видеомагнитофон/Видеокамера) или CHARGE(Зарядка) не загорается. Мигает сигнальная лампаCHARGE (Зарядка). Когда мигает сигнальная лампа CHARGE (Зарядка) Провести проверку по следующей схеме: ∗ Когда вы используете батарейный ист...
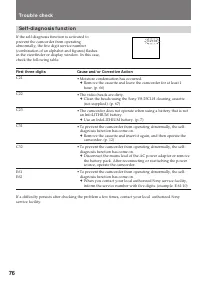
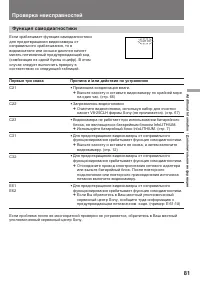
стр. 75 - Первые три знака; Функция самодиагностики; Причина и /или действия по устранению; Произошла конденсация влаги.
81 Additional Information / Дополнительная информация C:21:00 Первые три знака C21 C22 C23 C31 C32 E61E62 Если проблема после ее многократной проверки не устраняется, обратитесь в Ваш местныйуполномоченный сервисный центр Sony. Функция самодиагностики Если срабатывает функция самодиагностикидля пред...
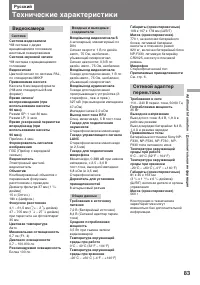
стр. 76 - Технические характеристики
83 Additional Information / Дополнительная информация Русский Технические характеристики Видеокамера Система Система видеозаписи ЧМ система с двумявращающимися головками,винтовым сканированием Система звуковой записи ЧМ система с вращающимисяголовками Видеосигнал Цветной сигнал по системе PAL,по ста...
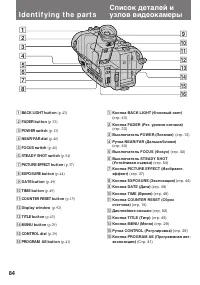
стр. 77 - Identifying the parts; Дисплейное окошко
84 Identifying the parts 1 BACK LIGHT button (p.43) 2 FADER button (p.33) 3 POWER switch (p.13) 4 NEAR/FAR dial (p.40) 5 FOCUS switch (p.40) 6 STEADY SHOT switch (p.54) 7 PICTURE EFFECT button (p.37) 8 EXPOSURE button (p.44) 9 DATE button (p.49) !º TIME button (p.49) !¡ COUNTER RESET button (p.15) !...
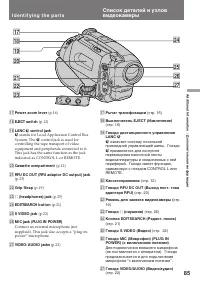
стр. 78 - stands for Local Application Control Bus; Рычаг трансфокации; означает систему локальной; Кассетоприемник
85 Additional Information / Дополнительная информация !¶ Power zoom lever (p.16) !• EJECT switch (p.12) !ª LANC l control jack l stands for Local Application Control Bus System. The l control jack is used for controlling the tape transport of videoequipment and peripherals connected to it.This jack ...
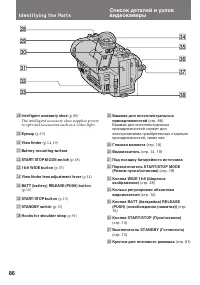
стр. 79 - Identifying the Parts; Глазная манжета
86 Identifying the Parts @• Intelligent accessory shoe (p.88) The intelligent accessory shoe supplies powerto optional accessories such as a video light. @ª Eyecup (p.19) #º Viewfinder (p.14, 19) #¡ Battery mounting surface #™ START/STOP MODE switch (p.18) #£ 16:9 WIDE button (p.35) #¢ Viewfinder le...
стр. 81 - Для просмотра демонстрации; Держа нажатой кнопку; Note on the intelligent accessory shoe; To watch the demonstration; While holding down
88 Identifying the parts Список деталей и узловвидеокамеры Примечание относительно держателя дляустановки принадлежностей Служит для подвода питания квспомогательным принадлежностям, как,например видеолампа или микрофон.Держатель для установки принадлежностейсвязан с переключателем STANDBY, которыйп...
стр. 82 - Remote Commander; Transmitter
89 Additional Information / Дополнительная информация Remote Commander The buttons that have the same name on theRemote Commander as on the camcorderfunction identically. 1 Transmitter Point toward the remote sensor to control thecamcorder after turning on the camcorder. 2 Video control buttons (p.2...
стр. 83 - To prepare the Remote Commander; Note on battery life; To use the Remote Commander; Срок службы батареек
90 Identifying the parts To prepare the Remote Commander Insert two R6 (size AA) batteries by matching the+ and – on the batteries to the diagram inside thebattery compartment. Список деталей и узловвидеокамеры Для подготовки пультадистанционного управления Вставьте две батарейки R6 (размера АА),уст...
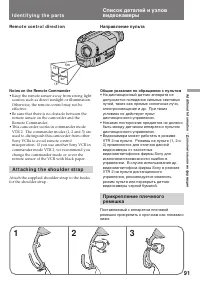
стр. 84 - Remote control direction; Notes on the Remote Commander; • Keep the remote sensor away from strong light; Attaching the shoulder strap; Направление пульта; Общие указания по обращению с пультом; • На дистанционный датчик аппарата не
91 Additional Information / Дополнительная информация 30° 15° 30° 15° 5m Remote control direction Notes on the Remote Commander • Keep the remote sensor away from strong light sources such as direct sunlight or illumination.Otherwise, the remote control may not beeffective. • Be sure that there is n...
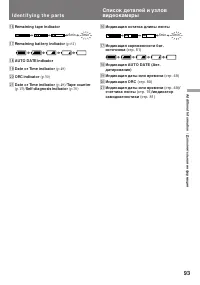
стр. 85 - ORC; Функциональный индикатор
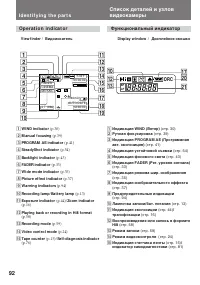
92 Operation indicator Identifying the parts 1 WIND indicator (p.30) 2 Manual focusing (p.39) 3 PROGRAM AE indicator (p.41) 4 SteadyShot indicator (p.54) 5 Backlight indicator (p.43) 6 FADER indicator (p.33) 7 Wide mode indicator (p.35) 8 Picture effect indicator (p.37) 9 Warning indicators (p.94) !...
стр. 87 - Warning indicators; : you can hear the beep sound when the BEEP is
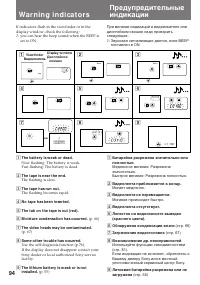
94 1 2 3 4 5 6 7 8 9 5min 0min CLEANING CASSETTE C:31:10 C:21:00 4 7 1997 Warning indicators If indicators flash in the viewfinder or in thedisplay window, check the following: ≥ : you can hear the beep sound when the BEEP is set to ON. 1 The battery is weak or dead. Slow flashing: The battery is we...
стр. 88 - Sony Corporation; Алфавитный указатель; Функция ANTI GROUND
Sony Corporation Printed in Japan Алфавитный указатель А Авт. фокусировка ................. 39Автомобильная батарея ....... 28 Б, В Батарейка InfoLITHIUM ........ 63Ветер ...................................... 30Видеозапись .......................... 13Введение/выведение видеоизображения ..............


 Sony CCD-TR2300E
Инструкция по эксплуатации
Sony CCD-TR2300E
Инструкция по эксплуатации
 Sony CCD-TR3100E
Инструкция по эксплуатации
Sony CCD-TR3100E
Инструкция по эксплуатации
 Sony CCD-TR311E
Инструкция по эксплуатации
Sony CCD-TR311E
Инструкция по эксплуатации
 Sony CCD-TR315E
Инструкция по эксплуатации
Sony CCD-TR315E
Инструкция по эксплуатации
 Sony CCD-TR317E
Инструкция по эксплуатации
Sony CCD-TR317E
Инструкция по эксплуатации
 Sony CCD-TR3300E
Инструкция по эксплуатации
Sony CCD-TR3300E
Инструкция по эксплуатации
 Sony CCD-TR3400E
Инструкция по эксплуатации
Sony CCD-TR3400E
Инструкция по эксплуатации
 Sony CCD-TR411E / CCD-TR412E
Инструкция по эксплуатации
Sony CCD-TR411E / CCD-TR412E
Инструкция по эксплуатации
 Sony CCD-TR415E
Инструкция по эксплуатации
Sony CCD-TR415E
Инструкция по эксплуатации
 Sony CCD-TR417E
Инструкция по эксплуатации
Sony CCD-TR417E
Инструкция по эксплуатации
 Sony CCD-TR425E
Инструкция по эксплуатации
Sony CCD-TR425E
Инструкция по эксплуатации
 Sony CCD-TR427E
Инструкция по эксплуатации
Sony CCD-TR427E
Инструкция по эксплуатации
 Sony CCD-TR501E / CCD-TR502E
Инструкция по эксплуатации
Sony CCD-TR501E / CCD-TR502E
Инструкция по эксплуатации
 Sony CCD-TR503E / CCD-TR506E
Инструкция по эксплуатации
Sony CCD-TR503E / CCD-TR506E
Инструкция по эксплуатации
 Sony CCD-TR511E / CCD-TR512E
Инструкция по эксплуатации
Sony CCD-TR511E / CCD-TR512E
Инструкция по эксплуатации
 Sony CCD-TR515E
Инструкция по эксплуатации
Sony CCD-TR515E
Инструкция по эксплуатации
 Sony CCD-TR516E
Инструкция по эксплуатации
Sony CCD-TR516E
Инструкция по эксплуатации
 Sony CCD-TR617E
Инструкция по эксплуатации
Sony CCD-TR617E
Инструкция по эксплуатации
 Sony CCD-TR618E
Инструкция по эксплуатации
Sony CCD-TR618E
Инструкция по эксплуатации